Media | Articles
Sand in the Gears of My A/C Compressor Rebuild

Last week, I posted an article about rebuilding the Behr “wingcell” (rotary vane) A/C compressor from the FrankenThirty (my salvage-titled 1988 BMW E30 3 Series). The idea was that the car isn’t worth much, so it made sense to me to pursue a “clean the black gunk out of the compressor and see what happens” approach instead of my usual “You’re an idiot if you think that anything short of replacing every component under the hood is going to give you a cold car” philosophy. Other than contamination with black particulate matter from a sponge meant to hold lubricating oil, the compressor looked pretty good. This was highly satisfying. I sourced the proper seal kit, cleaned and resealed everything, and put it back together.
But while writing last week’s piece, I was reminded of a question regarding one o-ring. Both the Santech exploded parts diagram and a DIY on BimmerForums.com post showed the o-ring sitting in front of a carbon ring on the compressor shaft, but photos I took during disassembly didn’t show it in my compressor.

Since I was essentially outvoted 2-1 by these online sources, I installed the o-ring. But the issue bugged me. As I looked in my photos, I thought it possible that the carbon ring may have had the old hardened black o-ring still sitting in its groove, and that the new green o-ring was incorrectly above it. Even though I’d already buttoned the compressor up, I couldn’t resist the fact that I could have it apart in about 15 minutes and quit worrying about it.

So back in I went.
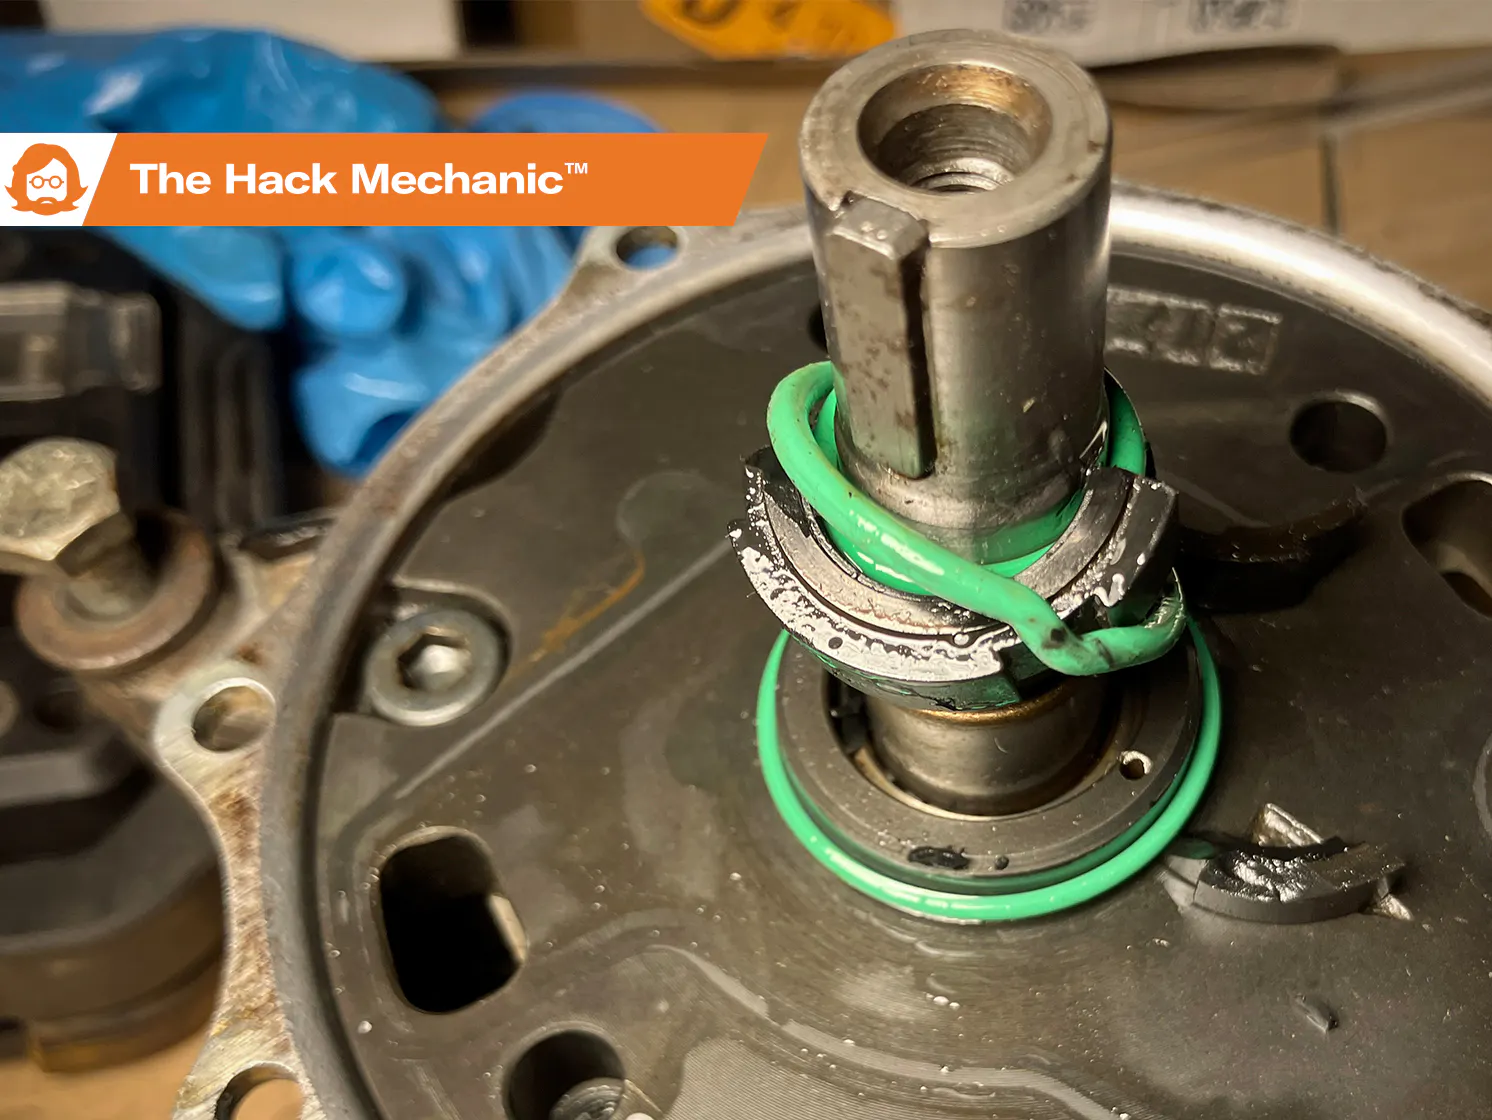
Good thing, too, because when I opened the compressor up, this is what I found. The carbon ring, inside of which was one correctly-positioned o-ring, and on top of which was one apparently incorrectly-positioned o-ring, had shattered into pieces. And as I mentioned last week, the carbon ring is an unobtanium part.
Marketplace
Buy and sell classics with confidence


Just as unexpected (but now a moot point) was the fact that I was wrong about thinking that the carbon ring had a groove in it that was occupied by an old hardened black o-ring. It didn’t. It appeared to be a mark in the casting.

Since the carbon ring appeared to be unavailable anywhere, I had few choices. One was to find an inexpensive wingcell compressor in garbage condition, buy it, dismantle it, and use the carbon ring in my just-rebuilt compressor. But since I didn’t know whether that green o-ring was supposed to be there or why my carbon ring shattered, I was hesitant to try this approach. Also, a quick perusal on eBay showed that even compressors in parts/rebuild condition had asking prices north of $100 shipped.
I gave a look on Facebook Marketplace to see what was available locally. To my surprise, I saw an ad that unmistakably showed a wingcell compressor and said “Bought this for my ‘83 BMW 533i, and found that my compressor was working fine. I failed to return it soon enough to get a refund and now it is taking up space on my garage shelf. It is being sold as-is where-is and without warranty. I never used it, so it should be fine. It will come in the same box it arrived to me in. $178 or best offer.” The seller was up in Gloucester, Massachusetts, about an hour north of me.

As I said last week, what most folks would do in my situation is to replace the somewhat obscure wingcell compressor with a modern Sanden or one of its many Chinese-made clones. However, that has a cascade effect, as you need a different bracket to mount the Sanden, and the fittings on the compressor are neither the same size nor in the same place as the wingcell. And since the lines plumbing the compressor have bent aluminum sections, adapting the hoses and fittings isn’t trivial. There’s a kit for all this which has everything including a modern parallel-flow condenser and a proper Spal fan, but it comes to about $1750, which is an order of magnitude more than I want to spend on resurrecting the A/C on this car. This is why I want to stick with the original wingcell compressor unless there’s direct evidence that the entire rest of the underhood A/C system is garbage.
So I messaged the seller of the rebuilt wingcell and told him my story. I said that, by all means, he should sell it for as much as he can, but I’d offer him a hundred bucks and could come up there anytime. He responded quickly, saying “Sounds fair.” The following morning, amid light snow, I shot up to Gloucester. Great seller, this guy; he had a BMW E30 and an E-Type Jaguar in his garage, and he was thrilled that something that had been sitting on a shelf for years was finding a home in another E30.
As I thought through the path forward, what made sense to me was to test the condenser fan, flush the hoses, hang the compressor from the bracket, install the new receiver-drier, connect the hoses with new o-rings, and then pressure-test the system to see if anything else was leaking. After all, if it turned out that the condenser fan was seized and the condenser had a hole in it, the expense of getting the FrankenThirty air-conditioned might cause me to abandon the project.
I found a broken wire on the condenser fan, but once I cajoled it into connectivity, the fan sprung to life.
I then used compressed air to give all the hoses and hard lines a blow-out, prior to flushing them with mineral spirits. I rubber-banded a paper towel on the outlet end to catch what was blown out, and was met with a rude but not wholly surprising result. The suction line from the evaporator to the compressor blew pretty clean but the discharge path beginning at the condenser, going to the (already removed) receiver-drier and running to the evaporator core, was loaded with rust. I could simply look inside the receiver-drier and see how rusty everything was inside, but even with it removed, there was still a lot of brown powder blowing out of the lines it had been connected to. It was likely that there was a lot of surface rust coating the inside of the condenser, as well as possibly the metal hoses themselves.

I continued using compressed air to blow until a paper towel came up not spotless but at least free of large amounts of particulates. I then switched to flushing with pressurized mineral spirits. When I flushed the condenser, the clear mineral spirits came out brown. This was not looking good. But hey, a plan’s a plan, so I continued.
I prepared to temporarily install the compressor on its bracket and immediately saw a problem: The fitting for the suction port was damaged, likely in shipping. I should’ve noticed it when I bought it from the guy in Gloucester. Fortunately, this port unbolts from the body of the compressor, and I had recently taken it off the one I was rebuilding and cleaned the screen and replaced the o-ring inside. I swapped it on and continued.

I hung the compressor from the bracket but didn’t tighten any of the bolts, then slid fresh green o-rings onto the hose fittings and tightened them onto the compressor. I then did the same with the new receiver-drier. I dragged my nitrogen bottle out from the back of the garage, connected my manifold gauge set to the service ports on the car, connected the center yellow hose to the nitrogen bottle, cracked open the regulator to about 100 psi, and listened. (Why every person doing A/C work doesn’t do this is beyond me. Instead, they try to find leaks when pulling a vacuum, or charge it up and wait to see dye, both of which are more difficult and take longer than preventive pressure testing.)
I immediately heard nitrogen hissing out. A lot of it. Via my ears and my hands, I determined it was coming from a joint in the metal suction line running along the fender. I thought that there must be a bad o-ring inside the joint. I hadn’t thought to replace these, but clearly it was necessary.

When I took a wrench to the large nut, I found that it wasn’t even remotely tight, furthering my suspicion that it was possible that this A/C system hadn’t been brought back into service after the car’s salvage event in 1992. I opened up the joint, replaced the o-ring, then did the same on the smaller joint on the discharge line next to it. That one looked visibly rusty inside. And this was after blowing it out with both compressed air and mineral spirits. This budget A/C rejuvenation was looking more and more like a fool’s errand.

Still, I continued. I pressurized the system again and heard no more audible hissing. The reading on the gauge, however, dropped before my eyes. I used a piece of flexible tubing held to my ear (an old flexible corrugated air hose from my Porsche 911SC, the last piece of the car I still have) and poked it around near all the under-hood A/C fittings. I found that the leakage was coming from one of the compressor fittings. I sprayed Big-Blu leak detection fluid on them, and bubbles gushed out from the top of the nut on the suction fitting.

I undid the fitting and found that I’d overtightened it, causing the o-ring to be cut. I did this two more times until I found the degree of tightness that sealed the o-ring without crushing it. This is unusual: Usually you can feel where the metal end of the fitting bottoms out and stop there. I’m not sure why this one was so persnickety.

After that, the system passed the entrance exam part of the pressure test; it held pressure for ten minutes. To be clear, if I were to entertain actually charging it up, I’d first let it see if it held pressure overnight.
I need to think about the next steps carefully. If someone presented this situation to me and asked for my advice, I’d tell them that they were fooling themselves if they thought a functional and reliable system was feasible without replacing the condenser and every hose and hard line. At about $115, a new parallel-flow condenser isn’t bad, but it’s not clear whether all the lines are even available. It would be a much easier decision if I found that the condenser was punctured and one of the rubber hoses had a big gash in the side. Then again, if only a small amount of fine particulates are coming out, I may just open it up again, run a stiff test-tube brush through the discharge tubes that I can reach, flush it again, charge it up, and see what happens. The receiver-drier does act like a filter, and the suction port of the compressor has a mesh screen in it, as well. It’ll be a bit of a delicate dance waiting for warm weather while still leaving myself time if I have to tear things back apart and do more invasive surgery.
To be continued… (though maybe not next week).
***
Rob’s latest book, The Best Of The Hack Mechanic™: 35 years of hacks, kluges, and assorted automotive mayhem, is available on Amazon here. His other seven books are available here on Amazon, or you can order personally inscribed copies from Rob’s website, www.robsiegel.com.


I’m thoroughly enjoying this adventure.
Pro tip: Leaving the nitrogen in there overnight helps pull moisture out of the system. Purge and then immediately throw it on the vacuum pump and you’ll likely get a few degrees cooler performance. This works on any A/C system. The more moisture you can get out, the better it’ll run.
Rob, nice multi-part series to support you seminal work It Just Needs a Charge. One question, why do you just not pull the rusted hard lines and have replacements made if NOS are not available? As the one photo shows that one line is rusted extensively and will continue to contaminate your AC system. I realize you are, let’s say thrifty, but it could not possibly cost to much to have new lines bent and flanged to match the originals sense the originals could be used as blueprints.
I dunno. A lot of my toys do not have functioning A/C for one reason or another, and I’ve just learned to live with it – primarily because in some cases they never had it.
You have the compressor, so I guess it’s hard not to move forward, but I would definitely be looking to aggressively address the rust. I wonder if you could blow wads of steel wool through those lines
I’ve heard that condensers can’t really be completely cleaned out – which may be “interweb wisdom” (translation: BS) – but for $115, I don’t know that I’d want to prove/disprove that.
I’m staring down the barrel of a non-functioning R12 system on my ’89 GMC Dually, and not looking forward to it. (See also, “misery loves company”, haha…)
It’s been a journey on this one. Lots of gunk and particles. Have to love breaking o-rings over and over.
I’m with TG. None of my pleasure vehicles have ever had functioning A/C. Partly because I’m cold blooded (comfortable into the high 80’s no matter the humidity and functional until 100) and partly because of cost I just can’t justify it.
But the resourceful tinkerer in me has a suggestion to offer: remove the formed hard lines, use them as a template to copy onto new lines, then cut the original lines a few inches from the end fittings. They could then be thoroughly cleaned and flare fitted onto the new middle sections.
A fitting tribute to the first BMW that actually produced something resembling cool air.
Thanks for reminding me why my wife’s car, and mine, will go another Summer without A/C .
I thought you lived in the Northeast why do you need A/C? Just roll down the windows and enjoy the exhaust noise!!!
Yes, but when I road trip down to North Carolina for a vintage BMW event in May, it can be a snotty hot drive without a/c.
Shop air? Nitrogen only. Too much moisture in shop air unless you use a drier