Media | Articles
Rebuilding a Behr “Wingcell” Compressor

So. I have this 1988 BMW E30 325is that I bought last summer. I named it “the FrankenThirty” because its salvage title turned out to include the fact that the rear two-thirds of the car matched its VIN as a post-facelift E30, but the front clip and low-horsepower “eta” engine turned out to be from a pre-facelift 325e. While the car is essentially rust-free, and while I’ve grown to appreciate its ratty-runner drive-and-park-anywhere sensibility, one of the reasons my wife stays married to me is that I try to be as cost-conscious as one can be in this hobby/passion. The Frankstein’s-monster-like status of the car is always going to place a hard cap on its value, so I tend to dole out spending on it with an eyedropper.
The problem is that, if you want a certain result, it’s often difficult to be miserly with money. I’m hoping to drive the car this May to The Vintage, the BMW event I attend annually in Asheville, North Carolina, and plan to resurrect the car’s non-functional air conditioning before I do.
If you’ve read my book Just Needs a Recharge: The Hack Mechanic Guide to Vintage Air Conditioning, you know that my basic case is that, if you’re planning on resurrecting a decades-dead or long-dormant A/C system, you’re living in fantasy-land if you think you’re not going to throw away every component under the hood—compressor, bracket, condenser, fan, receiver-dryer, and all hoses. In addition, if the car originally had R12 in it and you want the system to blow cold when converted to R134a, modifications generally need to be made that increase the cost or level of effort, usually both. Hopefully you can reuse the under-dash components (evaporator core and fan) and replace only the expansion valve.
If you do the work yourself, the parts bill usually comes to somewhere between $500 and $1000, but much depends on the era of the car. For example, in a BMW 2002, none of the A/C systems were factory-installed; all were dealer-installed options with rubber hoses and big upright compressors that looked like lawnmower engines. The odds of the 50-year-old rubber hoses not leaking are essentially zero. You make new ones with a crimping tool. There are only four of them anyway.
However, ten years ago I owned almost the identical car to the FrankenThirty but without the salvage title—a 1987 E30 325is. The E30 and its A/C system are two generations newer than that on a 2002. The compressor is a small compact rotary-style Behr unit commonly called a “wingcell” compressor, and many of the A/C lines aren’t rubber hoses but are instead form-bent aluminum. On the one hand, this tends to create longer-lived leak-free lines, but on the other hand, if they do leak, it makes them more expensive to renew, as you may not be able to easily replace them with rubber hoses and crimped fittings. It also means that using inexpensive universal-fit compressors, condensers, and receiver-driers isn’t as easy because the fittings on the A/C lines can’t simply be swung into position if the fittings on the components aren’t in the same place.
Marketplace
Buy and sell classics with confidence

When I bought the previous E30, it had a seized A/C compressor. I yanked it out, found only a small amount of particulate matter in the hoses, flushed them and the evaporator and condenser with mineral spirits until they ran clear, found a good used compressor, bolted everything up, leak-tested it, recharged it with good old-fashioned R12 (which, contrary to a lot of misinformation, is not illegal), and got myself a cold car for very short money.
As Herman’s Hermits sang, second verse, same as the first?
The FrankenThirty had a leg up on its predecessor in that its compressor wasn’t seized. Whenever starting this kind of work, though, I always begin with removing and draining the compressor. That way, if it’s contaminated, you see the crud flowing out of it. Plus, the odds that it has the right amount of oil in it are small, and the only way to know the level is to dump it all out and start over. When doing so, I was met with a rude surprise: The oil was contaminated with what looked like a lot of black particulate matter.


Initially I assumed it was the remnants of dried-up, ground-up rubber o-rings from inside the compressor or from some other component, but when I looked at it under a magnifier, it had almost a cellular structure to it. I discovered a handful of posts on multiple BMW forums, all of which were from the same poster in 2017, who was looking to rebuild his wingcell compressor, found the same black particulate matter in the oil, and who determined that the material came from a foam pad inside the compressor whose function appeared to be to hold oil in place. Further searching unearthed a well-photographed DIY where someone else had torn down a wingcell compressor, and an exploded parts diagram from the rebuild kit supplier Santech.

To be absolutely clear, my advice to anyone who found something like this would be to, as I did last time, find a good used compressor or a rebuilt unit, or if you’re a stickler for originality, have yours rebuilt. In fact, I rarely rebuild things like this—I’d much rather pay a little for something I know should work when I drop it in, and take the cost savings from the fact that I’m doing all the work myself. But with time on my hands and a desire to, whenever possible, avoid spending money on the FrankenThirty, in I went.
First I hosed the compressor down in the parts washer to get the bulk of crud off the outside.

Next, the two halves of the clutch plate had to come off. The outer plate had no clear way to grab it. The DIY showed it being levered off with screwdrivers. Posts on other forums cautioned strongly against this, as it’s likely to bend the pulley, but I had little choice and nothing to lose. Fortunately, I don’t think I damaged the pulley. After I removed it, I saw the threads on the inner face into which you’re supposed to thread a special puller. Live and learn.


The pulley, its bearing, and the lower clutch plate lift off next.

The clutch coil then unbolts to reveal the nose of the compressor.

The front cover of the compressor was held on around the circumference by 10-mm nuts and bolts, which came off easily, and centrally by four 6-mm Allen-head bolts that would not budge with hand tools. I hated to fire up my 40-year-old Sears Craftsman compressor in the under-deck closet when it was 14 degrees outside, but I had no choice. The impact wrench whacketa-wheeee’d the bolts out in short order.

With the cover off, I began to see bits of the black gritty foam, but nothing resembling a motherload, so I began the work of extracting the compressor core. This required removing the keyway on the compressor shaft and withdrawing a seal I later learned was no longer available.

The compressor core is then supposed to just slide out, but in something that’s never been disassembled, it often doesn’t work that way. I shot Silikroil around the edge, tapped it with a rubber mallet, and again playing the “nothing to lose” card, suspended the compressor upside down onto a pair of strategically positioned 2x4s, and repeatedly slammed it down. The core eventually gave way.


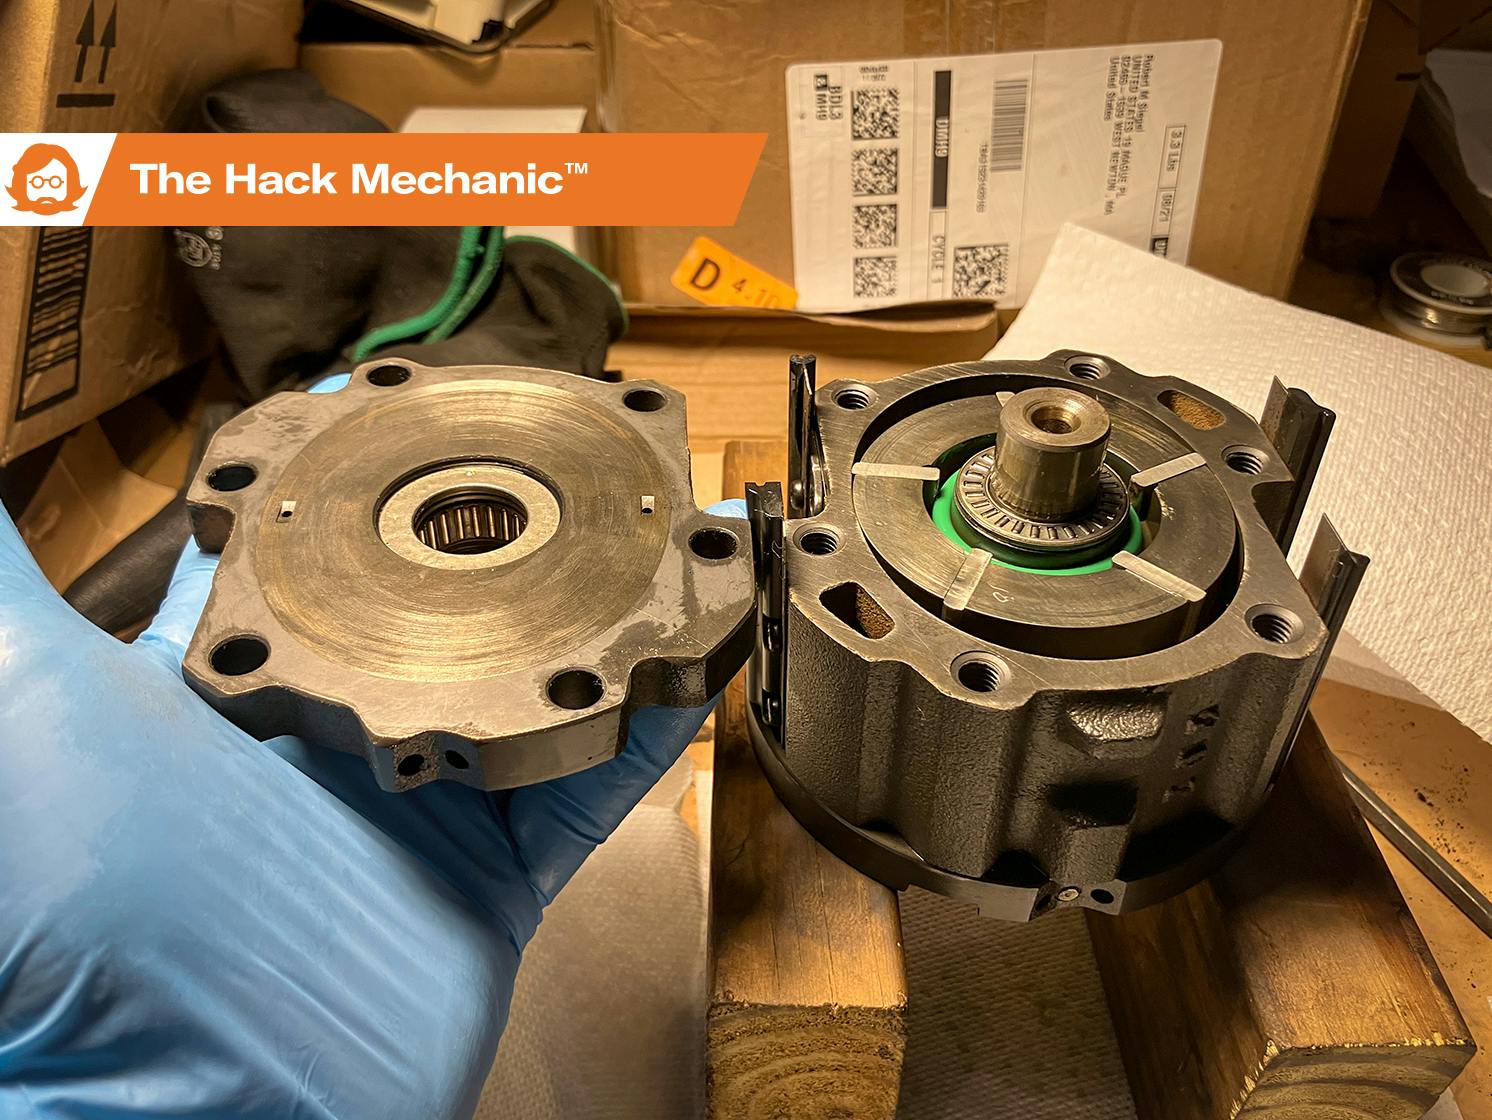
With the core removed, I could see a big ugly deposit of decomposed foam on the bottom.

This time, my assumption was that I had found the motherlode. Still, I didn’t know whether the compressor core itself was contaminated. Reading the DIY, it didn’t look like it was that big a deal to go all the way in, so I continued. More 6-mm Allen-head bolts succumbed to the twist of the impact wrench, and I carefully lifted the inner cover.


The view inside the compressor core was a glorious bit of form-follows-function. With all the A/C rejuvenation work I do, where most of the time you replace an old dead upright piston-compressor with a Sanden compressor or one of its many Chinese-made clones, I’ve trained myself to say “rotary-style compressor” and not “rotary compressor” because the Sandens are actually piston compressors, even though their cylindrical form factor often makes people call them a “rotary compressor.” In contrast, even though the wingcell (which means “rotary vane”) compressor doesn’t have the triangular rotor that a true rotary engine has, you can see that it has the same kind of elongated inner chamber that a Wankel engine has, and vanes that are flung outward by their rotary motion, sealing against the chamber walls and creating a cell of gas that then gets compressed and pushed out the exhaust port. Pretty cool, huh?

The walls of the core had some light scoring but did not show the kind of wholesale contamination that the interior of the housing did. Still, I was glad to clean it out. I removed the vanes one at a time, cleaned the grooves with Q-Tips, then oiled and replaced them. I elected to leave the bearings alone, as I couldn’t find a source.
The gasket set, though—Santech / Omega kit MT-2107—was click-and-buy on eBay for $17 shipped. Of course, for a kit like this, what’s in the picture and what arrives may be different things, so I was hugely relieved when delivery showed that it appeared to be correct.

What wasn’t available, though, was the odd carbon shaft seal. However, upon close inspection, I found that the seal is just basically a two-piece housing for an internal o-ring, and as long as its two component pieces aren’t broken, all you need to do is open it and replace the o-ring inside it, which, to my delight, came with the other kit.

Replacement of all the o-rings was trivial, except that I was a bit confused by one that the exploded parts diagram showed as going on top of the carbon seal, as I didn’t recall finding one there during disassembly. The well-photographed DIY on the forum also showed the seal there, so I installed it. Both that seal as well as the big irregularly shaped seal inside the cover didn’t want to snap into their grooves and lay flat, so I laid the cover on the 2x4s, lowered the housing of the compressor over it, pushed it down and removed it a few times, verified that the seals weren’t rising out of their recess and getting pinched, and carefully snugged the cover down.

So the wingcell compressor is all back together. It’ll be quite a while before I know whether or not it A) is leak-free, B) compresses refrigerant, and B) cools the car. When I de-moused the car last fall, I replaced the evaporator core with a used one, as I could never completely get the smell out of the original one. I flushed it with mineral spirits before I installed it, but I’ll need to flush the rest of the system, install the compressor along with the new expansion valve and receiver-drier, install new o-rings in all their fittings, and leak-test the system before I do anything else.
But it’s only February. I’ve got time. Even if I’m wrong about the compressor, I love that I’ve only got seventeen bucks into it.
And hey—now I know what “wingcell” means.
***
Rob’s latest book, The Best Of The Hack Mechanic™: 35 years of hacks, kluges, and assorted automotive mayhem, is available on Amazon here. His other seven books are available here on Amazon, or you can order personally inscribed copies from Rob’s website, www.robsiegel.com.


Find more values
Search for prices of other cars, trucks, vans and motorcycles


You’re bang-on for cost. I replaced everything under the hood except the hoses last year when I resurrected my w126 A/C, but I did change the o-rings to nitrile units. Unfortunately, my laziness bit me in the ass, and my refusal to change the o-rings at the expansion valve saw compressor oil slowly leaking onto my right shoe.
I’ve never looked inside those compressors. It’s like a cross between a Gerotor pump and a wankel. Neat!
Rob, glad to see you are out from under the weather. So why are you not taking one of your low mileage original cars to Asheville to compete in the Primary Class? The Franklin car should be disqualified from Primary for being two cars in one and likewise for the Touring Division. Maybe the Modified Class but usually the winners of in the modified/custom class have spent big bucks on mechanical, air suspension, and paint.
My guess is that Rob values a new experience (especially one that not all would do) over chasing an award?
Besides, taking Franken to events could result in more of the story of the car coming out. Stranger things have happened.
I love a cheap fix. My daughter had a dodge stratus years ago. The thermostat housing was plastic and looked like 2 pieces pressed together. Where they joined a leak developed. Dealer only item priced about $120. I went down to the local pick a part salvage yard and found one that looked like brand new. The counter guy kinda recognized me because I stopped in several times. Asked how much and he shrugged and said how about a few bucks. $3 Bingo. I’m sure he didn’t know the cost of a new one
“Motherload” sounds vaguely pornographic.
The correct spelling is “motherlode.”
He spelled it correctly the second time
That looks like a bunch of work but it’s compact so hopefully not too much more pain. Next week on…
Rob, I assume that you want to drive this e30 to South Carolina so that you can write about the inevitable mishaps you’ll encounter (and have to fix) along the way.
Surely, in your vast collection, you must have several more suitable vehicles for a road trip?
And if the argument is “don’t destroy the value of a low-miles car by actually driving it”, well….
I have a ’97 Nissan Sentra with 328k mi that I’d like to drive on my annual trip to Cali – about 2k each way. Although the AC works ok, the engine has an excessive appetite for oil. I’d find it satisfying to finish up and take it on the long drive.
Short of Rob stating why he hopes to take the FrankenThirty to Asheville, I’d like to think it’s because he wants to drive a somewhat down-and-out vehicle he’s resurrected on a 2k mi round trip. Maybe it gets him to appreciate and feel good being capable of performing fairly elaborate and successful repairs on a shoestring budget. Or maybe, like you said – stock up on writing material. Something tells me he knows exactly why…
Rob, this story resonates with me. I just ordered a rebuild kit for the Bosch mono control valve for the HVAC system in my w123 Mercedes. The valve is no longer being produced, and a “tested” used valve on ebay is $220 — and the rebuild kit was $17.50. More than worth the risk to see if I can pull this off.
For myself, being in the position of “nothing to lose”, enables a new level of courage to attempt otherwise intimidating repairs.
Had a new 1979 320i with the Behr dealer installed AC with the huge York compressor, all was well until I rode a concrete lane divider on a bridge entry ramp, the compressor bracket and pulley took the brunt of it before the car went airborne sheared off a sign post and landed safely, long gash under the car from compressor to trunk but otherwise ok.
I have a 95 M3 that has always been a track car- the AC compressor had been removed for a long time- I drive to the track and the heat in the cabin is unbearable so I had to get it fixed. I had the 2 old lines and bought a new compressor at R&Y AC Compressors in Miami- about $120- took to my local shop in Chicago- and 5 hours later it was blowing cold and hard. Total was $900 but I was shocked that it actually works so well- I was dreading the outcome.