Media | Articles
Looking for answers about mechanical ignition? Check out this FAQ
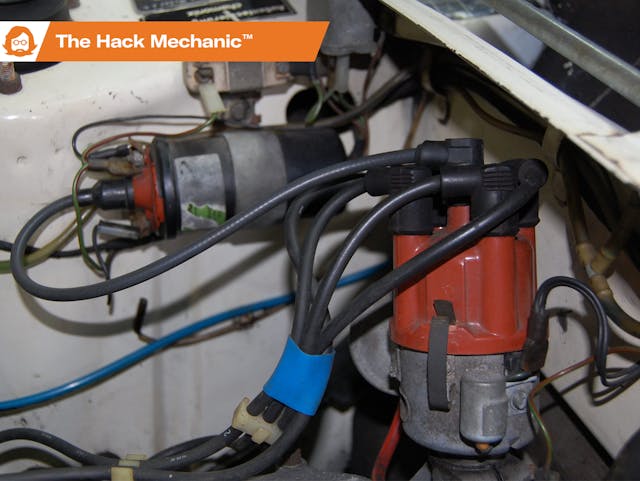
Because I get asked the same ignition-related questions over and over, I thought I’d take a moment and write up an FAQ. Obviously, there are some car-to-car variations, but the basics of distributor-coil-points-condenser are fairly universal.
What do you mean by “mechanical ignition”?
I’m referring to the ignition system on nearly all pre-mid-’70s cars that have three ignition-related functions which occur mechanically, whereas on later cars, some or all of them occur electronically. These three functions are:
- Contact points inside the distributor open and close, which triggers the ignition coil to generate high voltage.
- The distributor distributes that high voltage to each spark plug via a rotor that spins around inside the distributor cap.
- The distributor advances the spark via weights, springs, and moving plates inside the body of the distributor, so the spark fires sooner as engine rpm rises.
How does it work?
Spark—or, more correctly, the high voltage that generates spark—is created inside the ignition coil, but components inside distributor act as the triggering mechanism for that high voltage, generating it at the proper time. The main shaft inside the distributor has lobes on it, one for each cylinder, and those lobes force the points open momentarily as the shaft spins around. It is this opening of the points that toggles the coil between its low-voltage (“primary”) and high-voltage (“secondary”) settings. The condenser that’s mounted on the side of the distributor has several functions, but the simplest one is that it prevents spark from arcing across the points as they open and close.
The high voltage then travels out the fat wire from the center of the coil into the center of the distributor cap. As the distributor’s internal rotor spins around, it touches terminals on the insides of the cap that go to the wires to each spark plug, thereby distributing high voltage to each of the plugs. When the high voltage jumps the gap in each plug to ground, it creates a spark, which—kaBLAM!—ignites the fuel/air mixture in each cylinder at the proper time.
(By the way, we have Charles F. Kettering to thank for all of this. He designed the ubiquitous ignition we know, sometimes love, and occasionally want to tow to the junkyard and exchange for something not as ancient. This familiar ignition configuration was first installed on the 1910 Cadillac, and continued, with very few changes, for nearly 70 years. Fun fact: Mr. Kettering then quit his job at National Cash Register and formed a new company called Dayton Electronics Laboratories Corporation, whose initials we recognize as Delco.)
Marketplace
Buy and sell classics with confidence
There are many ignition-description videos on YouTube, but, in my opinion, the one below gives the best overview of how the system actually works, including a great level of detail on how the primary and secondary windings inside the coil actually create the high voltage.
And with that, let’s answer the most common questions I receive, framed within the context of how these three distributor functions changed over the years, and whether and how those improvements can be retrofitted into a vintage car.
Can I replace mechanical triggering with electronic triggering (Pertronix and the like)?
The first improvement, so-called electronic or “breakerless” ignition, came in the mid-to-late 1970s. One of the problems with points is that, over time, the point gap gradually gets smaller, which causes the timing to change. This happens for two reasons. The first is that the making and breaking of the electrical connection across the points causes them to develop pits on one side and mounds on the other, effectively bringing them closer together. The other is that the nylon block that rides on the distributor’s lobes gets worn down, causing the points to not open up as far. This is why checking and resetting the point gap—or, more accurately, setting the “dwell,” which is the angle out of a 360-degree engine rotation, during which the points are closed (they “dwell” together)—is part of a traditional tune-up on a vintage car.
As the point gap gets smaller, it creates two issues. The first is that the dwell itself goes out of spec. Eventually, the points don’t open far enough to trigger the secondary circuit and fire the coil, and the car dies by the side of the road. But the second issue is that the decreasing gap (the increasing dwell) retards the ignition timing, affecting performance and potentially making the engine run hotter. This is a significant effect. Depending on how you do the calculation, it’s either one or two degrees of advance per degree of dwell. Take the best case; say it’s one degree. The dwell spec on a four-cylinder car is usually about 55–65 degrees. Say you tune the car, set the dwell at 60 degrees, and time the car at 30 degrees of total advance with a timing light. And let’s say that, over time, the points close up from natural use and wear so that the next time you measure the dwell, it’s at 65 degrees. That is expected to retard the timing by five degrees from when it was last set. So, if your total advance had been 30 degrees, it’s now only 25. That’s a big change.
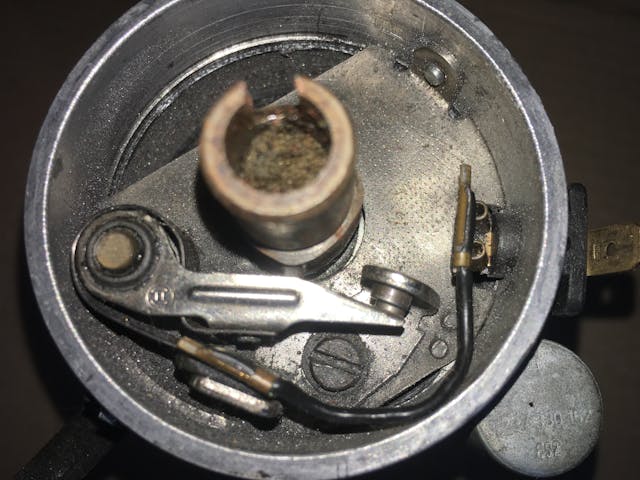
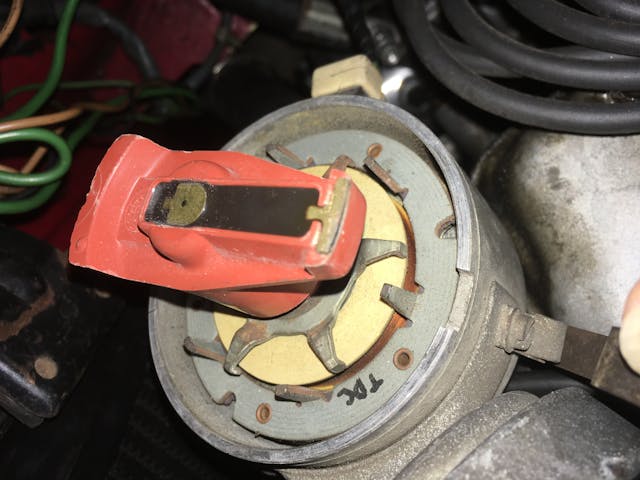
“Breakerless” ignition replaces the points and condenser with something non-mechanical that doesn’t wear, and thus shouldn’t change over time. Some early breakerless systems used a light passing through rotating slits, but most employed some sort of magnetic sensor. Early ones used a variable reluctor system with a star-shaped wheel. Later units used a Hall Effect system with a rotating magnetic ring on the shaft.
Electronic ignition first became available as an option in certain GM cars in the early 1960s. It was first incorporated as a standard configuration in the 1968 Fiat Dino, and became standard in American cars between 1973 and 1975. In the BMWs I’m familiar with, electronic ignition came in the late 1970s with a mid-series refresh. That is, a 1977 530i still had points, but a 1979 528i had an electronic ignition system with a variable reluctance transducer using a star-shaped reluctor wheel inside the distributor and a big electronic box on the firewall. The Pertronix and other similar electronic triggering systems that are often retrofitted into vintage cars is a much smaller Hall Effect system with a magnetic sleeve on the shaft and a tiny box that’s mounted inside the distributor in place of the points.
The main advantage of retrofitting an electronic triggering module is that by eliminating the points, you’re getting rid of the mechanical wear of the nylon block and the pitting of the points. This solves both the problem of the car dying because the points have gradually closed up or the nylon block has suddenly snapped off, as well as the changing point gap retarding the timing.
But by eliminating the condenser, you’re also solving another more recent problem—the fact that most new condensers are garbage. I’ve had new condensers in BMW boxes fail in five miles, and I hear many similar stories of people whose post-tune-up hard-starting and rough-running problems went away when they fished the old condenser out of the trash and reinstalled it.
The overall payoff is that your vintage car is less likely to die, say, while crossing the George Washington Bridge in New York because the points have closed up. Personally, I can do without that kind of stress in my life, particularly on a road trip where you’re supposed to be livin’ the dream.
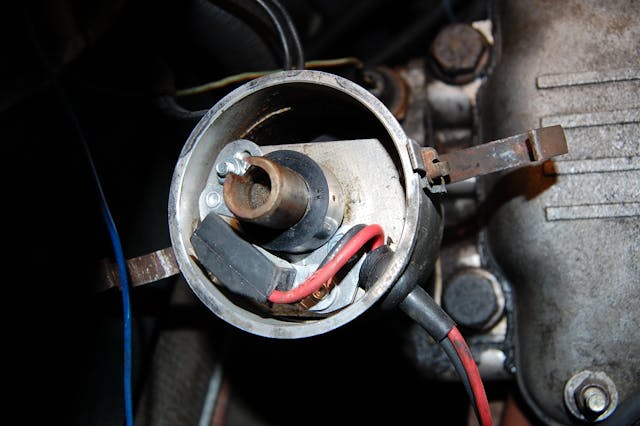
The disadvantage, according to some, is that you now have a little black box that can fail at any moment and is difficult to troubleshoot. I don’t subscribe to that view; I’ve only had Pertronix units fail when I’ve wired them incorrectly. Yes, I do keep points and a condenser in the trunk just in case. But given the choice between running on points/condenser and Pertronix for long road trips, I’d take electronic triggering every day of the week and twice on Sunday. I use it in all my vintage cars except the Bavaria, which for some reason did not run right on Pertronix—I was leaving for a road trip the next day, and I never circled back to figure out why.
Note that when you install an electronic triggering system, you’re getting rid of the points and condenser, but the distributor still has mechanical spark advance and is still mechanically distributing the spark to each cylinder. We’ll get to both of those in a moment.
Will electronic triggering improve performance?
No, not really. Some folks report that their cars idle smoother with electronic triggering installed, and that may be, but in general, electronic triggering is a maintenance-and-reliability improvement. You shouldn’t expect a performance improvement from it.
OK, I understand triggering. What goes wrong with timing?
Over time, the performance of mechanical spark advance (weight-and-spring-based advance systems in conventional distributors) degrades. Sometimes, due to lack of lubrication, the weights, springs, and plates will stick at the pivot points. Sometimes the advance will suddenly jump at certain engine rpms. Sometimes the mechanism is completely frozen. It’s not at all uncommon to put a timing light on a vintage car, shine it at a timing mark, rev up the engine, and not see the mark move, indicating that the distributor is triggering and distributing the spark but isn’t advancing it at all.
When was electronic spark advance first adopted?
The first system that used electronic advance was invented by Chrysler. Its “Electronic Lean-Burn” system, introduced in 1976 during the industry’s most stringent period of tightening in emissions regulations, was the first computer-controlled engine management system (can you imagine trying to computer-control a carburetor?). Its second generation in 1977 did away with centrifugal advance weights in favor of electronically controlled advance, using not only engine rpm and intake vacuum but also throttle position and opening speed and air and coolant temperature. The distributor itself, round with a standard cap, looked conventional. When the systems failed (or more likely, couldn’t be trouble-shot), components were often replaced with standard carburetors and centrifugal advance distributors, which was possible because the system was largely added on to the engine as opposed to being part of a designed whole.
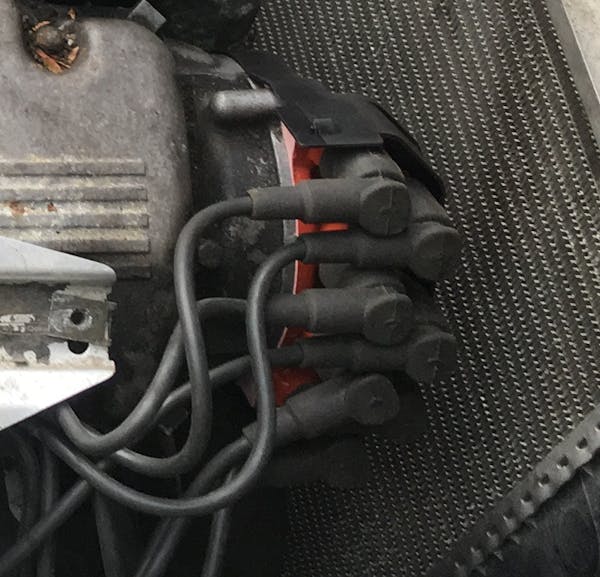
Beyond the footnote of “Lean-Burn,” electronic spark advance was part of incorporation of full-on digital engine management, which encompassed not only electronic advance and triggering but also electronic fuel injection. And for this, most folks credit Bosch’s “Motronic” system introduced in the early 1980s as being the first successful wide-spread system. You can identify it by the weird-looking oval distributor cap. Underneath it is a conventional rotor spun by the end of the camshaft, distributing the spark to each of the plug wires. However, there is no longer what you think of as a “distributor” performing triggering and with weights and springs to advance spark because both of these functions—triggering and advance—are handled electronically by the Motronic electronic control unit (ECU). Note that when you get into OBD-II-era cars, this configuration is replaced with “coil-on-plug” (COP) ignitions where each spark plug has a coil directly snapped onto it. That’s why, in later cars, you don’t even see an ignition coil, a cap, and a bundle of plug wires.
Can I retrofit electronic advance?
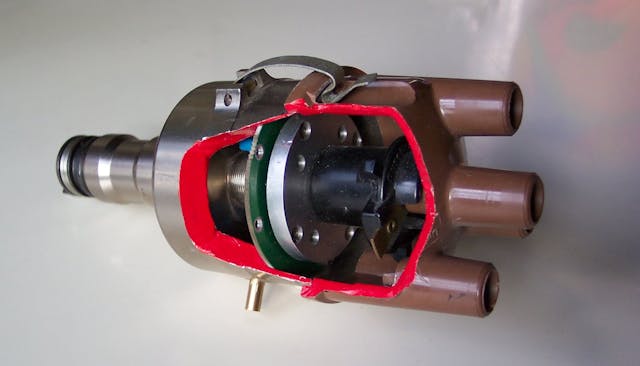
Actually, yes. And it’s easy. Look at the distributors manufactured by 123 Ignition. They’ve become very popular in vintage car circles, as they eliminate both mechanical triggering and mechanical spark advance. They look like conventional distributors, but inside, instead of springs and weights, there are electronics that control how much the ignition timing is advanced as a function of engine rpm (and, if you like, intake vacuum). The least-expensive versions of the 123 come with stored timing curves, but there are USB-programmable and Bluetooth-programmable models. You then can spend endless nights on your favorite user forum reading what curve is a good starting point for your engine with the high-compression pistons, hot cam, and big-throated carbs, and then uploading that curve and tweaking it.
Will electronic advance improve performance?
Yes, it should. Note that when you adjust the timing on a conventional distributor, rotating the body of the distributor to advance or retard the timing, all you’re doing is sliding the entire timing curve left or right by some amount of rpm. In contrast, on a programmable 123, you can dial in more advance within a specific rpm range. Thus, unlike installing a Pertronix or other electronic triggering, a properly tuned 123 should be a performance improvement. People report that once tweaked, their engines run better due to both the elimination of timing bounce and jitter from the springs and an advance curve that’s actually proper for their engine.
What in the hell does that ballast resistor actually do, and do I need it?
I get this question a lot. The ballast resistor is designed to limit the amount of current drawn by the coil while the engine is running, but to lift that restriction and allow for a stronger spark when the engine is started. That’s it—that’s all it is. It’s not difficult. And yet the confusion over them never ends.
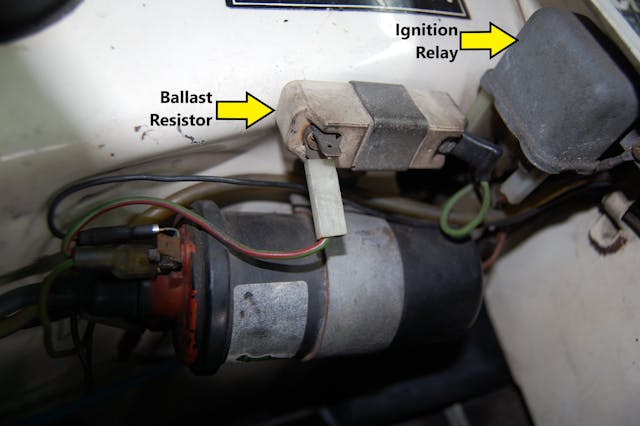
The simplest bypass method is to have the full current while cranking supplied directly to the coil’s “+” terminal by the starter solenoid, and the rest of the time have the current pass through the ballast resistor first, lowering the current. However, many cars instead use an ignition relay that’s energized when the ignition key is turned to “start” and sends current to the coil’s “+” terminal.
The original coils used on most 1970s European cars were Bosch Black coils that had about 2 ohms of resistance as measured between the “+” terminal and the “-” terminal. They were used with a white ceramic ballast resistor that had about 1 ohm of resistance, for a total series resistance of about 3 ohms. Part of the confusion is that at some point in the 1970s, Bosch began manufacturing its blue coils and marketing them as a performance improvement. They really weren’t, but with a 3-ohm internal resistance, they could be run without a ballast resistor. People didn’t understand the function of the resistor, and this was simpler, so simpler was better.
To make matters even more confusing, some cars have a “resistor wire” instead of a plainly visible ballast resistor, making it unclear whether there is additional series resistance.
Then, at some point, Bosch began selling red coils paired with red ballast resistors. As it did with the blue coils, Bosch marketed this as a performance set. I’ve measured these at about 1.7 ohms each, for a total series resistance of 3.4 ohms.
These numbers are important, because if you read the instructions on a Pertronix or similar triggering module, they warn that they need to be connected to coils with at least three ohms of resistance. If the resistance is lower, too much current can flow from the coil through the triggering electronics, damaging them. I can attest to this; I burned up a Pertronix by running it connected to an original Bosch Black coil from which someone had disconnected the original ballast resistor.
To summarize:
- If you have, or are going to install, an electronic triggering module, you need to be certain about the coil/ballast resistance. If you have a Bosch Blue coil, you’re fine, but for any other coil, measure the resistance from the input to the ballast resistor to the “-” side of the coil and make sure it’s at least 3 ohms. If it’s not a Blue coil, and you don’t see a ballast resistor, read up on whether your car has a “resistor wire” and, if so, verify that it’s still there.
- If you’re not using a Pertronix or similar triggering module, for earlier non-resistor-wire cars, if it has a Black or Red coil that’s meant to be run with a ballast resistor and the resistor isn’t there, it’ll probably cause the points to pit faster, but it’s not critical as it is with a Pertronix.
If there’s no spark, which ignition component do you suspect first?
I always check for spark by pulling the center wire out of the distributor, holding it near ground with rubber-handled pliers, and cranking the engine, as this eliminates the distributor cap and rotor from the equation. If there’s no spark, check that the coil is receiving 12 volts at the “+” terminal when the ignition is cracked to ignition, and that the spade connectors on that and the “-” terminal are firmly pushed on.
If there’s power but no spark, suspect the points first. Pull off the distributor cap and have someone crank the engine over while you watch the points. You should be able to see them open and close and see a faint arcing across them. Often, there’s no arc and they barely separate. Gap them to spec, which is often 0.016 inches (the old trick of using a matchbook really does get you close).
If there’s still no spark, suspect the condenser next. Sometimes all that’s wrong is that the screw holding it to the distributor is loose; that’s the ground path, so it must be snug. If you have an old “known-good” one, try swapping it.
It certainly is possible that the coil is bad, but it’s far less likely than the wiring, points, or condenser.
May your ignition always spark, and your points never close up on the George Washington Bridge.
***
Rob Siegel has been writing a column (The Hack Mechanic™) for BMW CCA Roundel magazine for 34 years and is the author of seven automotive books. His new book, The Lotus Chronicles: One man’s sordid tale of passion and madness resurrecting a 40-year-dead Lotus Europa Twin Cam Special, is now available on Amazon (as are his other books), or you can order personally-inscribed copies from Rob’s website, robsiegel.com.


