Media | Articles
How to Build the Perfect Junkyard Tool Kit

Your toolkit needs to strike a fine balance between luggable and overkill.
Just about every gearhead has been to a pull-a-part junkyard. The (mostly) American phenomenon of a self-service automotive dismantler has been around for generations, and they generally all look the same: rows and rows of decrepit donor cars begging to provide you with that one part you absolutely need to complete a restoration, get your car back on the road, or upgrade it to way cooler spec.
Junkyards can be intimidating. They’re hidden behind big fences, which are often topped with barbed wire that’s sometimes electrified. They’re filthy. And they’re full of cars (and, unfortunately, sometimes patrons) that are ready to slice into you if you cross them the wrong way.

They are, however, the best—and sometimes the only—place to find parts for many cars.
Here’s what you need to know about building a toolkit for a junkyard.
Marketplace
Buy and sell classics with confidence
Consider What Kind of Cars You Want to Pull Apart
Cars are held together with a staggering number of fasteners. Dismantling them can be easy—if you’re brutal, that is. We could argue for days about what’s easier to work on: an old car with relatively simple construction, or a new one designed with serviceability in mind but many layers of panels and wiring to work through.

Before you even start to pack up your toolbag, think about what you’re after—and what you’ll need to get there. If you’re planning to dig through an ‘80s Mercedes-Benz, you can leave your SAE sockets at home. The inverse is true, despite its misleading name, if you’re after International Harvester parts. Japanese cars use a special type of screw that looks like a Phillips but is shaped a bit differently. The best way to get into one without stripping the screw is to do so with a Japanese Industrial Standard (JIS) screwdriver. (Once you’ve used one, you’ll never go back.) You may also be surprised at how long some auto brands have used Torx screws, particularly for interior trim or body panels. Cheap Torx bits will round out easily, so it’s worth spending on good stuff.
If you’ve been through your car a number of times, you probably know what type of screws you’re bound to encounter. If not, flip through the service manual and see what tools it commonly calls for.

Newer cars—and by that, I mean cars from the last 50 or so years—tend to use a lot of plastic clips, which are astoundingly strong right up until they snap. And then they’re incredibly sharp, always in the way, and likely not quite broken enough to allow you to remove whatever they were holding together. Plan accordingly.
And if you’re after a specific part for a specific car, try to remove the one in your vehicle first. You’ll find out exactly what tools are needed for that job. Then again, this isn’t always the best advice, as sometimes it can be very useful to “practice” on a junkyard car before tearing yours apart.
Find the Right Carrying Case

You may wind up doing a lot of walking in a junkyard, which means you probably don’t need an enormous toolkit. Personally, I prefer a relatively lightweight, low-frill, fabric bag with a zipper at the top. My current junkyard toolbag came with a set of power tools I bought at a big-box store. I’ve used it for about two years, and it shows little wear thanks to its durable construction. It might be my favorite bag yet. Others may prefer a hard plastic or metal toolbox. If you’re a junkyard regular, you’ve certainly seen people lug wheeled tool chests around. To each their own, but this seems like a gigantic pain.
Here’s why I like a simple fabric bag: For one, they’re inexpensive. You’ll inevitably snag the bag on something, and a tool bag with a hole in it is pretty much useless. Fewer pockets mean fewer places to accidentally leave a part in the bag from your last trip, which will irritate the folks at the entrance counter. A zipper on top means that your tools won’t inadvertently fall out. One with fairly large handles can double as a carrier for some of your freshly snagged parts, too.
Now Fill the Bag With the Right Tools

Critically, your junkyard tools should be of good—but not heirloom—quality. A cheap screwdriver will bend, which renders your trip to the junkyard pointless. Conversely, your family might disown you if you let on that you accidentally left Great-Grandpa’s favorite Snap-On screwdriver in the trunk of a Buick at the local Pick-n-Pull.
The best junkyard tools are, generally, older ones. They’re the brand-name ones you find at estate sales or garage sales. You likely didn’t pay much for them, and they’re probably a little beat up, but they will do the job for generations. Perhaps most importantly, you have no attachment to them. Also, watch for sales at your local hardware store, particularly around summer or winter holidays. You might be able to snag a brand-name ratchet set for $9.99. (And, if so, you should buy a couple!)
By no means is this an exhaustive list, but it can serve as a starting point—or a checklist as you’re preparing to walk out the door.

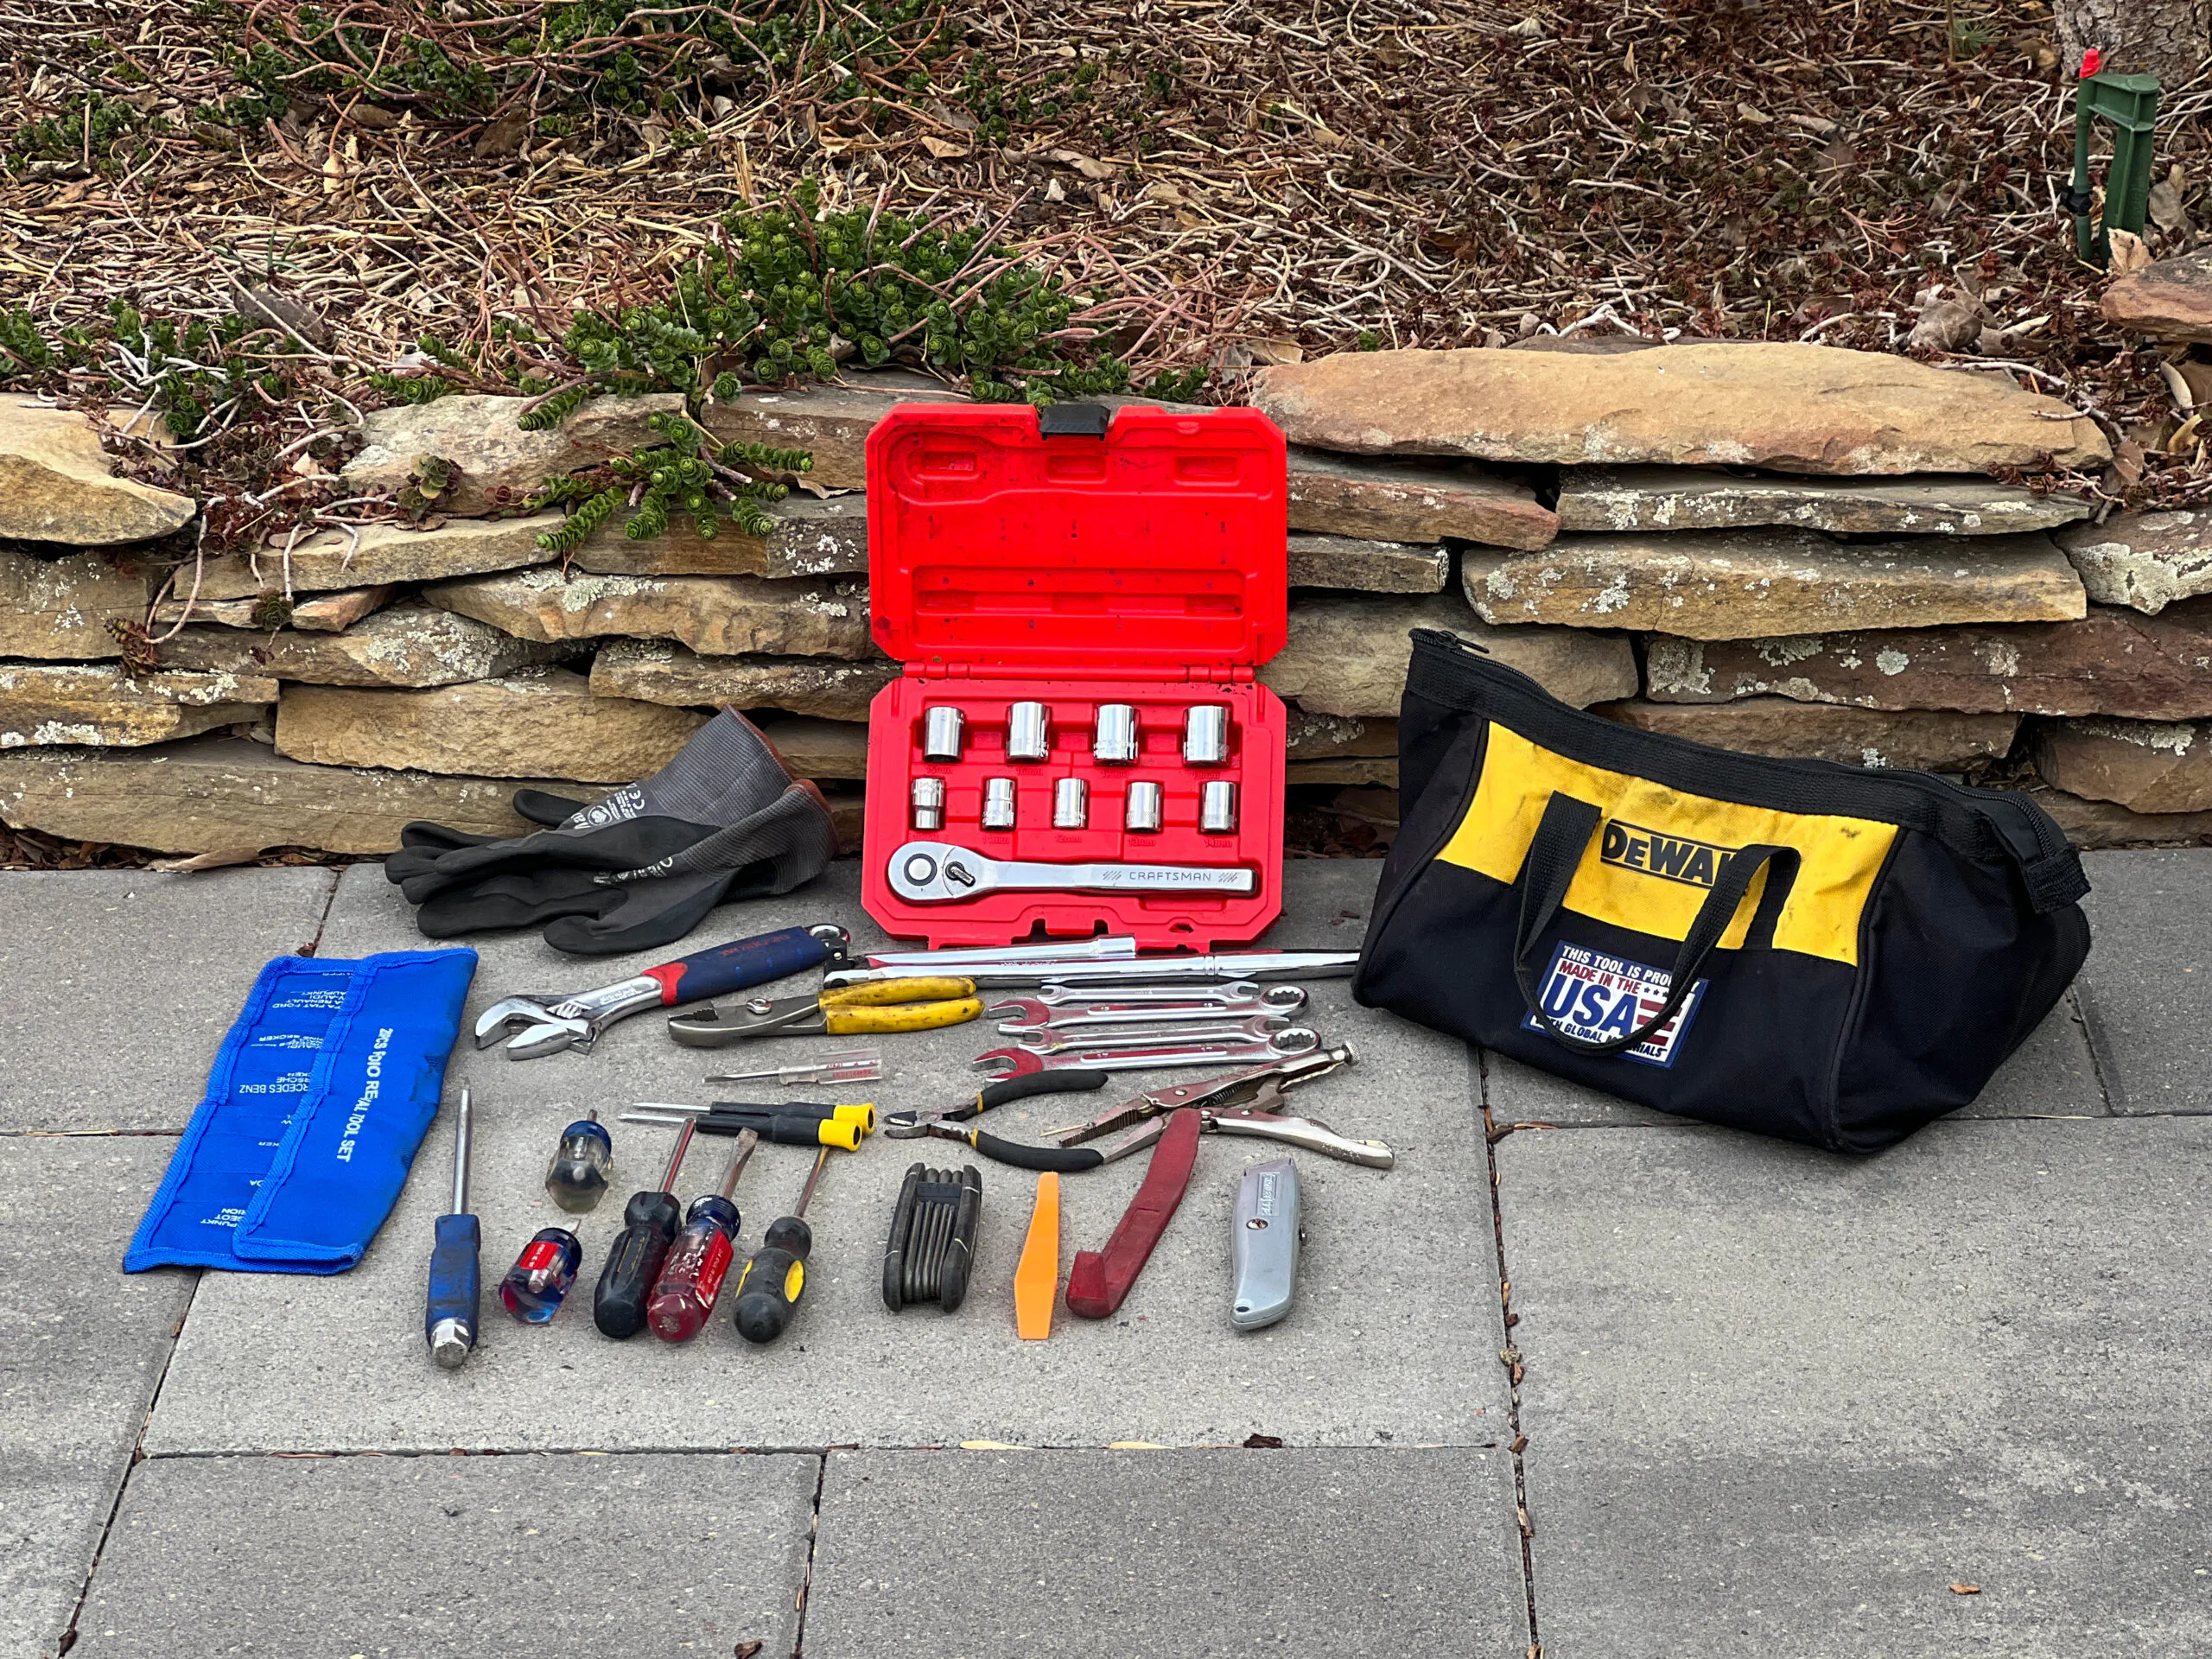
First, the basics, which don’t need much explanation:
- Short and long flathead and Phillips (or JIS) screwdrivers
- SAE or metric sockets in commonly used sizes
- Ratchet
- Ratchet extensions
- SAE or metric wrenches in commonly used sizes
- Sharp utility knife
- Folding Torx tools
- Various pliers capable of cutting wires or locking onto a particularly fussy bolt
- Durable but not disposable or especially thick gloves

Some specialty tools, which may or may not apply to your specific needs:
And here are some tools that you might not have thought of:
A long and very skinny flathead screwdriver can come in handy for myriad uses, including unlatching tiny electrical connectors buried deep in the dashboard. Interior trim removal tools will help prevent the destruction of interior panels. If you plan to attack parts that are hard to reach or need more torque, grab either a breaker bar or an 18-inch ratchet. Many junkyards will also allow you to bring in an electric power impact driver, which should be accompanied by the correct impact sockets. Pack safety glasses if you plan on crawling underneath the vehicle. (Actually, just keep a set in your go-bag—you never know when you might need them, and eyes are important.) If you want to retain the small screws, nuts, and bolts that held the part into the donor car, pack some sealable plastic bags and perhaps a permanent marker so you don’t forget what goes where. A small bottle of hand sanitizer is useful if the junkyard doesn’t have clean bathrooms.
Don’t despair if you’ve forgotten a tool or if one breaks while you’re extracting a part. Some junkyards sell the used tools that their employees find. Who knows—you may be able to buy back the 13 mm socket you left in the yard the last time you were there.

Generally, junkyards will let you take just about any tool you want inside, but some can be picky about power tools. Most won’t let you bring a jack, a torch, or a grinding tool. A surprising number of the places I’ve visited allow gas generators, though you may not be able to bring a separate fuel container. You can often bring a battery jumper box, which can be useful to power up a car’s electronics to confirm their operation before removal. Just be very careful when you do this, as you have to assume the vehicle has been doused in flammable fluids and that its wiring harness has been hacked apart.
Junkyards typically provide wheelbarrows or carts so you can haul large, heavy items. Many sell water, but you shouldn’t count on it. If it’s a hot day, be sure to bring in a bottle to stay hydrated.

There aren’t many tools I would personally recommend leaving at home aside from the kind of small multibit screwdriver you might keep in a kitchen drawer for quick household jobs. They’re simply too fiddly to use.
One last thing: Be sure to empty your toolbag out periodically. Receipts, screws, and small bits you completely forgot you tossed in there can and will accumulate.
How to Make the TSA Happy

Pro tip: if you’re traveling somewhere and you have some spare time booked into your schedule, check the inventory at nearby self-service junkyards. Who knows, they might just happen to have a 1946 Pontiac Streamliner or a 1993 Geo Storm GSi.
The Transportation Security Administration is pretty straightforward about what kind of tools it will allow you to carry onto an airplane. They must be 7 inches or less in length. Anything longer will need to go into your checked suitcase. Measure your tools once, twice, or maybe even three times before putting them in your carry-on; a TSA agent will take away your 7.02-inch screwdriver.
While you might consider a screwdriver to be a sharp object, the TSA doesn’t. It classifies sharp objects as items like box cutters, utility knives, and throwing stars (yes, really) as “sharp objects,” which are not permitted on board an aircraft. They’ll have to go in your suitcase.

Ultimately, your ability to place tools in your carry-on depends on the TSA agent’s whims. What flies—literally—at Boston Logan might not make it on your plane in Chicago O’Hare.
As I said earlier, self-service junkyards are mostly found in the U.S. and Canada, though they can also be found in a few other largely English-speaking locales. If you happen to be heading to New Zealand or Scotland, you’ll find a few yards that are strikingly similar to ours. You’ll follow the same TSA rules whether you’re heading to Auckland or Abilene, but the carry-on and checked-bag requirements may be different on the way back home. Consult local government security websites for their rules unless you want to leave your screwdrivers at Heathrow. As for that super-rare part you found abroad, if you can’t check it, shipping can be surprisingly reasonable if you don’t mind it taking the slow boat.


Find more values
Search for prices of other cars, trucks, vans and motorcycles


Hand cleaner is a must for me. I mark my tools with a strip of yellow duct tape. so I can easily find. all of them when I am done pulling the parts.
Praise the new lithium age. Always a cordless impact ratchet, M18 cutoff wheel and plenty of batteries. Flash light, lantern type better, breaker bar and pipe extension. Plastic bags to tote smallest items. Kinda depend on what you looking for and what you might find for later.
Yes – wasp killer! eyewear, mask for airborne rodent poop depending on location some of droppings contain deadly virus. Then there’s spiders & snakes. Stuff a younger me never gave 2nd thought to. ’if planned right, a spare jack, stands, wood blocks in the trunk won’t be too much.
Spline sockets set gets you both metric and SAE at half the weight
Great article I lament that most of the pick it yards have closed .Do an article on the yards that are open still .
Checkout strategy . . . years ago (when dinosaurs roamed the earth) I was keeping a 1986 Audi 5000 running almost exclusively with junkyard parts. Mine was standard shift, 99% of them were automatic, and the automatics died in 40K miles or so and of course everyone was scared of them (unintended acceleration BS). It was actually a very nice car, media black eye notwithstanding.
Other than the transmissions, just about everything else was the same as the standard shift cars. Electronics, trim, fuel pump (known issue), body parts, the works.
So here is how I worked it. Get a wheelbarrow from the parts yard, go harvest parts galore. Stack them in the wheelbarrow with the expensive stuff (electronic modules, etc.) at the bottom, mid-price dirty stuff in the middle (brake discs and similar), and inexpensive stuff on top (kick panels, carpets).
Go to the front of the yard, wash hands, buy a soda and relax. When you see a LOT of people coming to check out, try to get in the middle of the line. The droids at the checkout window will be rushed because everyone wants out NOW and they’ll look at your top layer of cheap stuff and maybe, just maybe, as far down as the middle layer of heavy, grubby stuff.
$30, now go away. OK, thanks, bye.
Hundreds of dollars saved for a few hours work. In five years, I had to buy exactly ONE part from an Audi dealer – the gearshift rod, which had plastic ends, none of the parts cars (and there were many) were standard shift.
Really? You are OK trying to cheat a small, independent, (probably) businessman ???
He owns an Audi, he doesn’t care.
B^)
All good coments – be sure to include a flat pry bar – one of those you can get at Harbor Freight for $3.99, about 15 inches long and 2 inches wide and shaped like a L at the end in case you have to get medieval on somthing.
The first thing to do is look for a junkyard. They are getting scarce as the number of car people gets lower.
I always used a backpack for carrying junkyard tools. And, regarding the comment about newer cars being designed for serviceability, I have yet to run across one of them.
Did someone mention a “cheater” bar? I always take a 3 ft long lead pipe with me, about 1 1/2 inch openings at each end, so you can slide it onto a rachet or breaker bat & use the extra leverage to force free a seized nut or bolt. Used these alot on army tanks in the field, just remember to push the bar & not pull it in case ur feet slip(fall on back/ass hurts), and wear heavy leather gloves(hands will slip off & bust knuckles, but less meat & skin removed). Also as a backup when those impact wrenches aren’t enough for rusted bolts, or the batteries die.
Great article! Big shout out to Hagerty for such an article. Cheers!
Lots of good suggestions and comments but NEVER bring a dogbone wrench. Yes, they have all the sizes but those big ends don’t fit ANYWHERE. I bought mine when I was 12 (almost 6 decades ago). I don’t think I’ve used it successfully yet.
a fold-up hand cart makes it easy to carry out your treasures as well as your tools.
A wheeled carrier is important so that you don’t have to lug tools around.. Just push the cart..
I use a 2-wheel dolly, put my junkyard toolbox on it, with extra straps and bungie cords. Have some rags and waterless hand cleaner to clean up when finished. The dolly rolls easy over gravel, and once done you can strap all of the parts to the dolly and wheel on out to the front. I think it’s better than the wheelbarrows, and no worries about all the wheelbarrows being used by other customers.
I always take a sturdy 2 wheel hand cart to both carry my tool bag in/out & to carry the parts, as well as a rachet strap(2 are better!) to secure the parts to the cart as I head (usually) from the farthest corner of the yard (& uphill, at that) to stand in line at the check-out to pay!!
Did I miss a flashlight? What about an extension magnet…maybe with a flashlight on it. Cell service…so many YouTube channels help with how-to fix…also tells you how to dismantle and in many cases possible cross reference to another car using the same part.