Media | Articles
6 Things I Learned from My DIY Home Paint Booth

Body work and paint projects are the bane of most DIY enthusiasts, but with a small amount of preparation and patience it is very possible to do good quality work at home affordably. While making progress on my Honda XR600R motorcycle project recently, I set up a paint booth and tested out a few methods, techniques, and tools to see if spraying finishes at home in the garage is really as difficult as some on the internet make it sound.
In short, I got great results with minimal investment, and believe you can too. The trick to getting acceptable final product is all in the preparation and understanding of task at hand. Over the years I have been striving for better and more professional finishes from at-home projects, progressing from rattle cans to a quality spray gun and decent-sized compressor. Here are six tips that I’ve learned over the years which will help make whatever your next paint project is better than ever.
Lighting Is Crucial to a Decent Finish

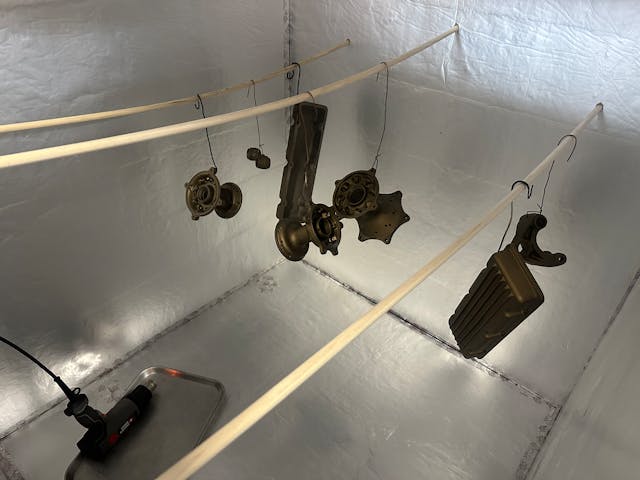
I wouldn’t build an engine in the dark, so I am surprised I ever thought I could shoot an acceptable paint job in less-than-ideal light. Despite the fact my garage is well-lit for a garage, it was simply not enough. More accurately, the lights were not well-placed enough to allow me to keep track of how the paint went onto the parts and pieces strung up in my makeshift paint booth. Thin plastic seems like it would be transparent enough to allow the ceiling lights to effectively do their thing, but the plastic diffused their rays enough to soften the light inside the booth, making for difficult visual inspection of coverage.
My solution was to use an LED flashlight in my left hand while spraying with my right. This gave me enough light to see exactly what I was doing, but still caused problems when I would need to hold a piece steady or make sure that a larger patch was covered evenly. A better solution would be a few affordable LED shop lights on stands or even just laid on the floor to prevent shadows.
Overspray Should Not Be Underestimated

After some paint work in a storage unit years ago, I learned that paint sticks to everything it can and not just the part you want it to (surprise, I know). It’s inescapable—if you’re spraying paint, there will always be some that goes into the air rather than onto the target piece. But you can do something about overspray—you don’t simply have to accept its consequences.
Marketplace
Buy and sell classics with confidence


I chose to assemble a simple “spray booth” in my latest adventure by taping thin plastic sheeting to my garage ceiling, and despite looking like a scene from Dexter, it actually didn’t do as much as I had hoped. Overspray is nothing more than a bunch of paint floating in the air. You don’t want to be breathing that and neither does you garage fridge, heater, or project car. That overspray can settle and while rattle can residual can be relatively easy clean up (clay bar has worked for me in the past), spraying anything that is catalyzed should be handled carefully as overspray can have much more lasting consequences.
Maximizing Workflow Is Worth the Effort

One of more interesting parts of stepping up to a “real” paint gun instead of rattle cans is the need to keep track of time and be efficient to prevent paint from curing too much or not enough between coats, or even curing in the paint gun. That means it’s valuable to spend time ahead of time thinking through what you will do, in what order, and how.


It only took a short while to do a walk-through and figure out if I had everything I needed in the order I would need it. On the workbench was a mixing station right next to my vise that held the paint gun, allowing easy mix, pour, and into the booth. On the other side of the vise was a stainless chafing tray I used for cleanup, allowing me to clean the gun and material up the second I came out of the booth. It is also smart to think ahead for how to handle parts to ensure 100% paint coverage.
Pinching Pennies Is a Trade Off

As much as plastic sheeting taped to the ceiling works, it is also pretty fragile and I had to resort to using duct tape to keep it from falling down at inopportune times. I ended up ripping one of the pieces as I was squeezing my way into the booth where two sheets overlapped at the corner. Luckily that was during my last batch of parts, but that could have created a problem—any movement of the plastic shook a lot of dust and overspray into the air—which then stuck to my freshly painted parts. Spraying the floor with water before shooting paint helped keep dust from walking in the booth to a minimum.
And, while taping up plastic was a pain, patching the paint that ripped off with the duct tape was even more of an issue. Saving money on anything usually involves the trade-off of increased effort, and this was no different.
Small Parts Still Require Big Effort
In all, I spent about six hours setting up and prepping to paint, another four prepping and spraying parts, then an evening tearing everything down to be able to work on other projects again. In total I sprayed a dozen or so parts.
That’s a lot of work for not a lot of parts. Sure, some of that might be me needing to get better about batching, but I have to weigh the value of just getting it done vs. the amount of time the booth and the parts on the bench are both sitting idle and taking up space. Did I really need a full walk-in booth for this? Maybe not—a downdraft table-top booth would likely solve the vast majority of my needs and would likely help keep things moving faster.
The reward is worth it


Even with the complaints of some overspray and hassle of setup, the finished parts are worth it. Nothing can move the needle on a restoration like starting to put finishes on. Installing clean parts is great, but custom-painted and well-finished parts can take any project up a level. Putting the effort to clean and paint each part and piece is not trivial and I certainly don’t do it for every project of mine. Just be sure to think through all steps of the process before you start and you you’ll get great results.


Interesting and inspirational. What kind of paint gun do you use?
I have slowly been building out the infrastructure for a home paint booth. I acquired an industrial vaneaxial fan, removed four panes of glass from one of my garage windows, built a custom plenum to go from round fan to square window opening, and now have a garage fan (with filters) that will drive the garage noticeably positive… Important for dust control. At the other end I have an exhaust fan, considerably smaller, that will allow for evacuating overspray without driving the garage neutral or negative. I have also been acquiring a collection of garage lights in the general area where I will one day paint my languishing 65 Impala. I haven’t figured out paint booth walls yet, but I still have a way to go on body work.
I always figured if I was going to build a paint booth inside my garage I would make a frame out of PVC tubing that I could assemble and disassemble when needed. So far I haven’t required said booth but i do have a concept of a plan.
Temu has a portable that’s inflatable. I don’t have one, I just happened to see it for less than $700
I find small parts, as pictured, to be pretty easy. OTOH I have painted three cars and used a 10 x 20 enclosed canopy in the backyard. I also use a 4 stage turbine paint system which has a lot less overspray than a regular compressor/gun setup.
What brand and model is your system?
I watch a YouTube channel guy named Mark who rebuilds older semi-tractors and paints them himself. While a great guy, he boasts that instead of cleaning up guns, he just buys them in bulk at Princess Auto (Canada’s Harbor Freight) and tosses them after one use. Which taught me this: YouTubers make entirely TOO MUCH money off our watching them! 😂
The cheap ones are 20 bucks. You could spend close to that in mineral spirits cleaning one. He might be on to something
Plus, your time should be worth something (my father never did figure that out).
This article is spot on if being able to paint is your goal. That said, I had to repair and paint a hood and fender on momma’s car a few years ago. It came out okay but I was miserable the whole time and I learned that anyone who is good at bodywork and paint is worth every penny they charge. I gained a lot of respect for a good body shop. I just don’t have the patience. Kudos to those who do!
The first car that I painted was a Porsche (OK, it was a cheap 914) in my back yard. I was a teen, and of course getting ready always takes longer than expected, so it was dark by the time I was painting. The lights attracted a moth that floundered on the still-wet paint of the trunk while we willed it and shouted at it to die and quit making a trail across the trunk. It was funny, and the path polished up later, so no real damage. The urge to sqash it and end the damage was almost irresistible.
Now if I paint I put decent-thickness plastic on the garage walls and put a fan in one window and a filter in another. It works reasonably well, but the stress of painting the whole thing is hard. I’m thinking on my slow restoration that I am doing now is to just do one piece at a time or a few panels to keep the stress and pre-prep to a minimum. It’s a solid color so I hope that it will match OK if I’m consistent.
I have a set of four ZipWall posts (URL here – https://www.zipwall.com/). These make it easy to put up and hold up your plastic sheets. They don’t completely eliminate using tape, but your plastic sheets won’t come down until you want them to.
I use a tp tools system from Canfield, Ohio. The great thing is no H2O or oil contamination and low over spray and excellent run control. Turbine systems also offer excellent metallic distribution.
The cerakote stuff looks great. I have no room for paint unfortunately.
Great article. Many steps to a good paint job. The capture of dust within a portable paint booth is almost impossible but you laid out some good tips in your article. The hours of prep are most underrated by the typical Diy’er until they actually do it. It all starts with the purchase of that spray gun then the process and materials ladder begins……….
Amazing information and relived my past. I basically did the same thing years ago in a large barn/garage. I managed to paint about 12 cars as a side job in my 20s. The finish was very good for, but you would at times get the odd dust imperfection or a moth like the other post.
Anyway I would love to see more pics of the XR600. I am doing the same with a 1984 XL600. Full restoration. Thank you for the advice and post. It was a great read.
I have used a furnace blower fan on the floor for exhausting fumes and overspray outdoors. The box fan in the article is interesting but I am concerned with the exposed electric motor catching the fumes on fire. The furnace fan has not been an issue over the years, perhaps I’m wrong not to use the box fan set-up.