Media | Articles
Rolling, Rolling, Rolling
We were lucky. It happened one mile from our home, on the return leg of a 450-mile trip to the Chicago area. First we heard a “ka-bang!” followed by the metallic clanging sound of a wheel cover rolling down the road. A hubcap came loose, hit the car’s fender and took off down the road.
Fortunately, we were moving slowly so the damage was minimal. After taking the flashlight out of the glove box (we checked the batteries before we left), I found the wheel cover sitting in the grassy ditch on the other side of the road. I was happy to see it looked fine. The paint on the car had a small nick on the edge of the wheel well where the disc had hit it.
A nick isn’t a good thing, but the damage could have been much worse. Replacing even a common ’50s-style wheel disc today can cost $50–$100 and a fancy custom wheel cover or “tri-bar spinner” can set you back $300. On top of that, minor paint-chip repairs can run into the hundreds of dollars. On the other hand, a little hubcap maintenance is free.
That’s why it pays to check and take care of your wheel covers at the start of the season. Set aside about a half hour or 45 minutes for inspecting those shiny discs and adjusting the way they fit on the car if it’s necessary:
First, carefully remove one wheel cover with a large screwdriver or pry tool. Then, lay it backside down on a flat floor. Give it a close,
Marketplace
Buy and sell classics with confidence
overall inspection. Is it dirty, greasy or wet? Does it sit flat on the ground – or does it wobble? Are the edges smooth or wavy? How do the prongs or tabs on the back look?
Most older hubcaps attach to the wheels with prongs along their outside edge that grab the rim of a disc-type wheel. These prongs tend to flatten with age. They can get bent, too. Sometimes they actually break off, but luckily this is rare. No matter how they are damaged, mangled or missing prongs can result in a loose wheel cover. A loose cover can fly off when the car strikes a bump.
When a hubcap flies off, it’s probably going to hit the car. If you’re driving fast, it can hit hard enough to do significant paint damage. If the disc is heavy, it may dent or ding the sheet metal. If it’s a rear wheel cover and your car has fender skirts, all kinds of things can happen when it starts bouncing around inside the wheel well.
Once the wheel cover is off the car and you finish inspecting it, start your service procedure by cleaning and polishing both the front and rear sides. A high-quality metal polish can turn a sad-looking wheel cover into an almost-new one. Then apply wax to protect the clean finish. Wear gloves and a face mask when cleaning the grayish-black “dirt” on the back of the wheel cover. It may contain asbestos dust from old brakes shoes. Do not breathe this stuff!
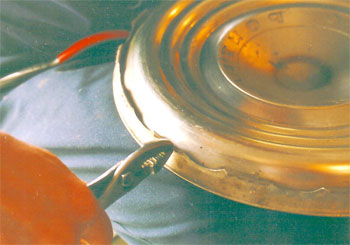
The prongs on the back of the wheel cover can be bent to close-to-original shape using ordinary hand tools such as a screwdriver, regular pliers and/or needle-nose pliers. Bend them a little at a time, and then make a test fit on the wheel. Through trial and error, you’ll get the tabs to grip the rim properly.
If a few tabs are missing but the others are bent back into shape, you’ll probably have enough gripping force to hold the wheel cover on the wheel. Only a test drive will tell you for sure. If the wheel cover still loosens, try carefully bending the remaining tabs a little further out so the wheel cover fits tighter. If this doesn’t work, you’ll need the broken prongs replaced or a new wheel cover.
Once you’ve taken care of the prongs, reinstall the wheel cover on the car wheel. Take care to move the opening for the tire valve stem to the proper position. It should allow the valve stem to pass right through without being squeezed or bent to one side. Now, snap the prongs into the wheel rim and push the wheel cover smoothly in place. It is best to install a wheel cover using only hand pressure.
If the edge of the wheel cover bulges out in any spot, tap it into place very gently with a fairly large rubber mallet. Do not tap hard enough to dent the wheel cover, which is easy to do. You should avoid tapping directly on the outside edges, which bend more easily. Tapping closer to the center will do the trick.
Finally, increase/decrease air for proper tire inflation specs. Too little or too much air can contribute to wheel covers shaking loose. With too little, your car will react more to bumps in the road. With too much air, you’ll get a firm, harsh ride that can jar a wheel cover loose.
Now you’re ready too roll without worries of your hubcaps rolling, rolling, rolling…
John “Gunner” Gunnell is the automotive books editor at Krause Publications in Iola, Wis., and former editor of Old Cars Weekly and Old Cars Price Guide.


