7 tips for plumbing your car
Even if you are doing a restoration, the task of assembling and filling all the systems of your car that have fluids in them is a large task. It’s often part of the last 10 percent of a project that often takes 90 percent of your time. While on the surface it is as easy as threading a few connectors, bleeding out air, and enjoying the drive, there are also a few things to keep in mind as you make some of what could be the final connections of your project car.
This topic came to mind when I dropped by the Redline Rebuild Garage to chat with one of Hagerty’s resident project car experts and Special Projects Editor Davin Rekow. He has been running wide open building a 440 Chrysler V-8 as of late, but off to the side sits the car that orange Mopar will live in: The Snowball dirt track racer. The team is pushing to get that car back on track and that includes sealing up all its systems. From the hustle and bustle in that shop, here are seven tips that will make your project better than ever—with no crack showing.
Take your time

This is a step that can make or break a project and it is best to take the moment ahead of actually picking up tools and parts to lay out a plan. What systems need plumbing? What materials are needed? Are there any techniques you’ll need for the job that you should try out now? The first time using a tubing bending or flaring tool should not be on what you hope is the finished part. Sure, that can work, but being lucky is a fickle thing, and trusting expensive parts and materials to luck is a fool’s errand.
Really this tip just comes down to the old saying “do it right or do it twice.” Davin has been plugging away at various aspects of this car for some time and is excited to have it done, but that doesn’t mean rushing and assembling a half-baked plan for things like brake lines, coolant hoses, fuel lines, or even oil lines and fittings. Well-thought-out and functional things take time to build. Give yourself enough time to do it right.
Mark the direction of flow

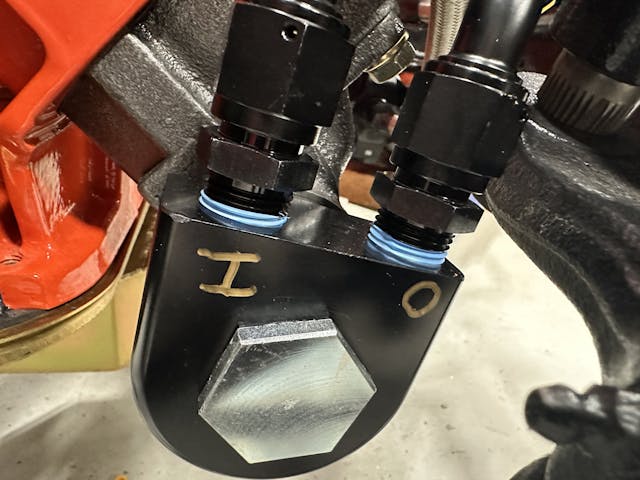
Sure, it seems obvious now, but what hose is going where and also what is inside of it and the fluid’s direction of travel is not as obvious once everything is assembled and you are no longer focused on the literal ins and outs of this system. Labels can be as boring or as interesting as you can imagine. A simple label by hand with a permanent marker is enough to get by but consider using zip ties or heat shrink to color code inlet and outlet hoses to prevent accidentally misassembling items in the future.
Keep it simple
The shortest distance between two points is a straight line. While show-winning cars have lines tucked ever so tidy and carefully bent over every hump or lump in the chassis, most at-home projects cars are a more nuanced blend of function and form. Save time and effort by doing what is needed to keep the lines safe but also install easily. This is something that might need servicing in the future and if it takes all afternoon to make a single brake line that could end up damaged and need re-done it could be mildly infuriating.
Allow for movement

Cars move and flex when they are driving. If there is no allowance in the running of the lines that travel to various parts of the car to keep those lines from stretching or binding, it is only time before a failure occurs. Take a look at the hydraulic systems of your car and you will realize none of those are fun to lose suddenly and catastrophically.
Don’t confuse allowing some movement with us endorsing letting everything run wild. Like a toddler in a grocery store, the plumbing on your car is best kept in order, and from touching things it shouldn’t. The front brake hoses appear miles too long at first glance, but the suspension of this car is set up to allow for a fair amount of travel. The last thing you want limiting that travel is your brake hose.
Use the proper product

It should go without saying, but use the right material for the job. Fuel line doesn’t make a good vacuum line, and vacuum line makes a terrible fuel line. Don’t even mess around with anything not designed for a brake system being installed inside that critically important system. For example, the hoses routed to the fuel pump feeding the 440 in this race car are approved for ethanol usage. Will this engine run on ethanol? Hopefully not, but if blended fuel ends up in the tank it won’t cause problems. Future-proofing is basically free right now.
In a similar way, a braided stainless line is better than a rubber line for most applications according to Davin. Rubber lines collapse internally given enough time, or are easily sliced or rubbed through. Stainless braided withstands that and a whole lot more for a fractional price difference.
AN fittings can be great

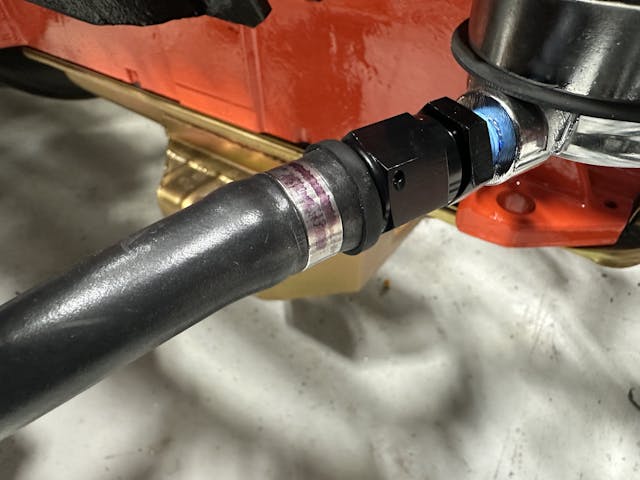
The history of this often colorful hose ends traces back to the war effort during WWII. The Army and Navy agreed on the standards that became the AN fitting. It centers around a two-piece fitting that clamps to the hose and makes it easy to make custom hoses of various lengths and sizes. Davin likes using it on his automotive projects because it makes things more serviceable and tidy at the cost of unoriginality—and literal cost. If you can tolerate deviating from factory-correct and budget has some room using these fitting can make life a lot easier. AN fittings and hose are not cheap but the customization possible now that the fittings come in various colors, and the fact that you can get hose for just about any application off the shelf, make it tough to turn down—and that’s before you talk about how serviceable these connection make a car.
Square up

If there is one little detail that always catches my eye, it’s nicely square-cut hose ends. They fit on fittings cleaner, and when clamped correctly have a very finished look despite being the simplest and cheapest way of joining a hose. Using proper hose cutters or taking the time to dress the end of a hose with a razor knife is basically free and can add a subtle touch that elevates your project from “thrown together” to “nicely detailed.”
If you seasoned veterans have any additional tips that might make someone’s next plumbing job easier, cleaner, or more efficient, please share them in the comments below.
***
Check out the Hagerty Media homepage so you don’t miss a single story, or better yet, bookmark it. To get our best stories delivered right to your inbox, subscribe to our newsletters.


The Teflon tape myth started when it was installed improperly and would find its way into the fuel system.
Guys would wrap it around the fitting leaving it partially hanging over the end of the line. It then would get sheared off when screwing on the fitting.
I always try to make air conditioning lines to the compressor such that you can remove the compressor and set it aside without having to open the system. A little bit of slack makes work down the road much easier.
No mention of brake lines. Best choice, hands down, is CuproNickel. Easy to work with, easy to form, flares nicely, lasts forever. More expensive than steel but worth the extra $$. Learned a trick from a professional. Before he makes up any line, he uses a roll of wire solder to form what he wants. Easy to bend, reusable etc. Make exactly what you want and its easy to straighten out and find the length you need. Then do your ends. Then remember you forgot to put on the fitting before you made the flare, and do it all over again. I know a guy who did that……
Regarding leaving room for movement in things like brake lines, don’t forget to also move the articulated part through its full range of motion and watch for potential pinch points or interference. Especially important on front wheels where you have both suspension motion and turning to deal with, so running the suspension through its full range while also turning lock to lock to ensure no pinch points are there. Buddy of mine made this mistake one time while lifting a truck, thing was great on the road, but the first time he took it off-road in terrain rugged enough to really work the suspension, that brake line was sheared off and left him in a pickle.
Don’t use the “hard” 90 degrees. Use the curved smooth ones.
Types of Teflon tape and their uses:
https://plumbuniversity.com/teflon-tape/
Use Stainless Teflon on stainless fittings to prevent galling. Gray colored and thicker.
never knew they made stainless teflon. you can use a small pick tool and remove the ugly blue tape after the fitting is tightened. would look much more professional .
I know ethanol is controversial as blended into almost all of our gasoline but I really don’t have a problem with it. Methanol, though, will be a severe problem if you plan to use it. Methanol is used for racing fuel but not normally for street use. The company where I worked during the OPEC embargo of the 70s was trying different alternatives to supplement gasoline in their fleet. We first tried methanol and what a disaster that was. Our fleet consisted of vehicles from all US manufacturers. Fords, at the time, used a short 5/16″ rubber fuel line connecting the steel line to the fuel filter on the carburetor. Methanol destroys rubber rather quickly and in no time we had Fords catching fire because this hose is very near the distributor and fuel spraying on a distributor is a fire waiting to happen. After ditching the methanol we began adding ethanol and no more problems of deteriorating rubber fuel hoses. I lived in Colorado during the 80s when they required “oxygenated” fuels during the winter months. The additives chosen to increase O2 in the fuel were ethanol and MPTP which was later found to be a carcinogen. During the warm months straight leaded or unleaded fuels were used. I always bought my gas at the Direct Tire Sales stations which used ethanol additive year round because it had a 2 point higher octane rating at no extra cost. This made a big difference in my 1977 Mercury with the 400M engine giving me an average 2mpg better than regular gasoline from other stations. And I never once had any problem with rubber in my fuel lines or with the diaphragm in the fuel pump.
Hard lines, hard lines, hard lines! Especially when it comes to fuel! A lot of people think stainless braided hose is the beez knees. And for a couple years it is. But 10 years on, it’s really just a rubber hose and you can’t see it cracking. I prefer exposed rubber, which you can diagnose at a glance, or hard lines, which last nearly forever.
I stopped using teflon tape years ago and instead use Permatex pipe jointing paste. I have never had it fail, and it allows easier adjustment of pipe angles during assembly as you do not have to tighten it too much.
Excess can just be wiped off leaving a good looking union.
Whats the best way too cut braided line so it doesn’t fray and the end will slide on?
GREAT article, and FANTASTIC photos, (from a professional photographer.)
Not only is your article very informative, but our always-helpful Hagerty Community gave their all too.
Thanks to ALL!