Before Driving Your Vintage Car, Check These 6 Things

Getting out on the road and enjoying our vintage cars is the majority of the reason most of us own them. Driving is what it’s all about, but driving safely is always the best plan. Many vintage cars now have spent time with owners who may not have been born when their car was built; if you find yourself in that camp, you may still be learning the day-to-day and year-to-year upkeep of your vehicle. Let’s take a look at a few checks and pre-drive rituals that will keep you and your old car happy for many miles to come.
Most owners and drivers of aging cars are diligent about inspecting them, but usually only once—when they buy the vehicle. After the purchase, most slip into the assumption that “it was fine when I parked it,” which can lull you into thinking everything is—and will remain—fine. Oftentimes everything is fine, but when a critical component or system isn’t, you can put more just yourself at risk. That’s worst-case scenario, of course; at a minimum, making a habit of regular quick inspections can save a lot of frustration and towing charges.
Tires: Pressure and Condition
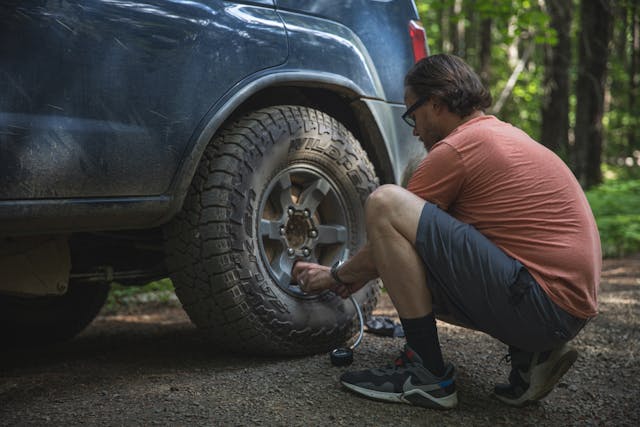
Tires are the only actual items that connect your multi-thousand-pound car to the road. We rely on those round rubber rings to not only grip the road surface but also to support the car. Having incorrect air pressure in the tires can produce unexpected changes in handling, cause a tire to build up heat and cause a blowout, or wear parts of the tire that aren’t designed to come in contact with the road.
Even a quick look while walking around the car is better than nothing, but make sure to check the pressure with a trusty gauge and look closer at the condition of the tread and sidewall. If you find an issue, that weekend drive you planned might get ruined, but that’s a whole lot better than finding the problem while going 55 mph and ruining a whole lot more.
Oil: Leaks, Level, and Condition
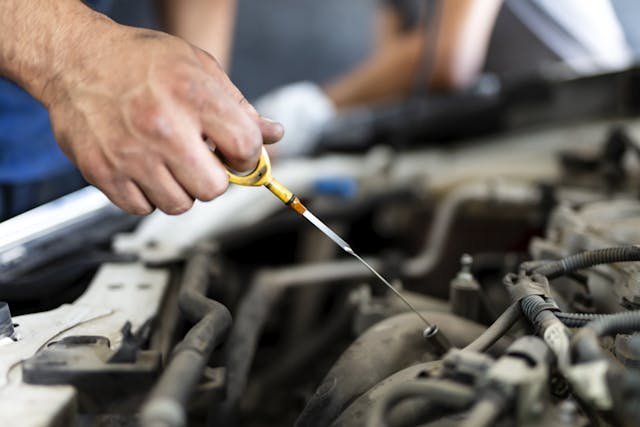
Engines live and die by the lubricants and other fluids contained within the block and heads. Just having enough oil and coolant will keep an engine alive far longer than some might think. Having clean and properly spec’d fluids will make a car run even longer and even better.
Taking a minute to pop the hood and pull the dipstick to confirm your car’s engine has the proper amount of oil is the bare minimum. Have a clean rag handy to wipe the dipstick clean and quickly inspect the oil for debris and color. A light amber is ideal, but tired engines can put a lot of combustion byproducts into oil relatively quickly, and those will turn oil darker. While you are thinking about fluids, take a peek under the car to confirm the oil leaks you might have did not get worse.
Steering: Is There Play?

A lot of people will say that old cars just have loose steering, but those people are only partially right. Vintage steering systems can feel less direct than modern designs but they should still be snug. Motion at the wheels should translate to motion at the front tires. After sliding into the driver’s seat, take a moment to observe the steering before starting the engine. This will help get an honest feel without the assistance of a power-steering pump, if your car is so equipped.
Lights

“How could anyone not notice a car as cool as mine?” We’ve all thought this while driving down the road, surrounded by homogeneous modern crossovers. The reality is a lot of drivers don’t care about vintage cars, and they have grown to expect vehicles to show daytime running lights, which vintage cars rarely have. An older vehicle can sneak up on many a modern driver, especially at dusk or in the early morning—you know, the best driving times.
That’s why it’s a good idea to do a quick walkaround or mirror check of the lights on all four corners of your car. Do your turn signals work? Has a bulb burned out? I like to turn on the lights of my Corvair before I open the garage door to see whether the headlights and turn signals work. I’ll also check the taillights—brake and running lights—in the rearview mirror, to see if they light up the back wall of the garage easily.
Brakes
Brakes, especially drum brakes, are notoriously difficult to inspect without some disassembly. One way I like to evaluate them is the hard/harder test. Before starting the engine, I push on the brake pedal with the force of a regular stop, such as I’d use when approaching a four-way stop, and hold that pressure for a moment to confirm the pedal does not sink further. After a short hold I then press harder, to mimic a panic stop, and again hold for a moment to ensure the system holds the pressure firm. I then release the pedal and ensure it returns to its correct position quickly and smoothly.
This works for both mechanical and hydraulic systems. Combine this simple test with a visual inspection of brake fluid level and condition, and you’ll have that much more peace of mind.
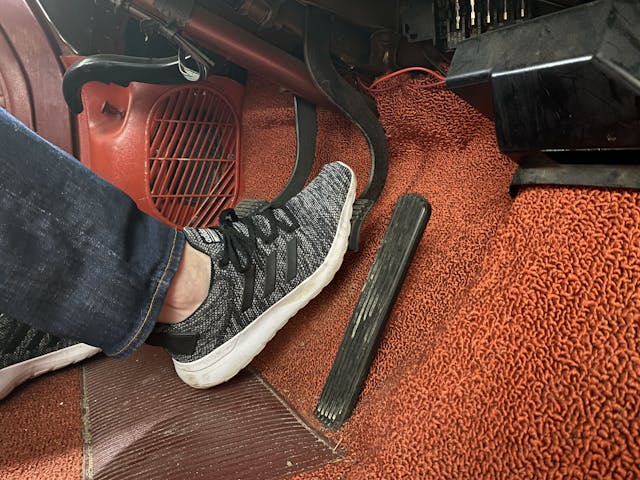
Throttle: Does It Stick?

The throttle is really fun to push, but more important than anything is the throttle’s return. Stuck throttles lead to bad situations. Before starting the engine, give the throttle a bump from fully closed to wide open and make sure it snaps shut quickly and without any binding. Many vintage cars use mechanical linkages or cables that can corrode or get grime in them which can slowly build up and cause problems. Best to catch such a problem while still in the garage or driveway.


Excellent article and comments, all important things to keep an eye out for. You can consider it part of the fun of having a vintage vehicle!
On the subject of tires, check the date codes. 10 year old tires are not a safe ride.
Do they make the small spares from different rubber? Or are they also supposed to be replaced? Are tractor tires made from different rubber? They seem to last a long time.
For cars with knock-offs, like the Triumph shown, pull the wheels and clean, inspect and lube the splines to make sure you can remove the wheel if you get a flat
This comprises more of a checklist than a full article. If you are ‘veteran’ enough to own and drive a veteran vehicle, you should know all these items. If you are a novice, learn them and check off. If you are not ‘veteran’ as a old vehicle driver… well, you probably won’t read this anyhow, even if it’s on your personal electronic communication device! I M Humble O
I was driving my 70 SS Chevelle when I thought that the steering felt looser than normal. Luckily we were only going to a friend’s house a few miles away. When we were getting ready to leave I heard a pop and something hit the ground. It was the top bolt off of the a-arm. Needless to say that could have been a really bad situation. So those are two bolts I always check.
Triple A RV Plus – 200 miles of towing !
I believe my Hagerty Drivers’ Club is 200 miles on my bottom rung “car” level, and my AAA is only 100 miles at the basic level.
My checklist includes most of those things, and – check coolant level, unplug battery tender (having backed out while plugged in several times), hat, reading glasses, bottle of water, wallet and cell phone. My checklist is on a 3 x 5 card and is thumbtacked onto the garage wall.
Make sure your phone is fully charged so you can call the tow truck.
I’ve noticed in a number of Hagerty articles that have showcased this Corvair Corsa with the 140 hp engine, that the fuel has been pump removed. But the hole that leads down to the fuel pump eccentric, inside the engine, appears to be open, allowing an entry point for dirt and stuff. Was the hole plugged down inside, or is this still a work in progress?
i was gonna make a sarcastic comment to kyle about his car never having fuel issues, seeing that the pump wasn’t installed AND no fuel lines. it’s probably a dummy engine with an ev motor stuffed in the frunk!
That’s a big leap to assume when electric fuel pumps are a common reliability upgrade…
You are correct Bob. That specific photo you mention was taken before the aluminum plug that seals the crankcase when converting to an electric fuel pump had arrived in the mail. Good eye!
Things you should check on any vehicle you drive.
I bought a “vintage” (old) boat with a Johnson 2-stroke outboard some years ago and the seller told me the the PO had told HIM to always disconnect the fuel line after an outing and let the engine run the carbs dry before putting the boat away. This was to prevent the fuel in the carbs from evaporating and leaving an oily, gummy mess. For vintage car owners who don’t drive their cars for weeks or months at a time, this might be a good practice as well. Carbs that need to be rebuilt often are because gas has evaporated and gummed up jets and float valves. If you have a switched electric pump, this would be easy. Otherwise, you need to install a check valve in the fuel line.
Many English cars, like my Triumphs, have levers on the fuel pump that allow you to pump fuel into empty carb float bowls before you crank the engine, which greatly facilitates a start after the car has been sitting a while
People noted the tires’ date codes and added a few things, but I always like to point out to keep an eye on the seat belt mounts, whether factory or added to a car not made with them. If they’re simply drilled into a floor not made for them they should be backed-up by a reinforcing plate. it’s a good idea to pull that plate (assuming it isn’t welded in place) to check for rust. This is especially true since floor-mounted seat belts are usually the low point of the interior, which can hold a bit of water even if it seems dry.
I’m switching my period correct seat belts for retractable belts. No, they don’t look quite like what was available in 1966, but they keep the belt against your chest far better than the ones that need constant manual adjusting to keep them tight. I also highly recommend switching to 3-point belts if your car only came with lap belts. I’m also upgrading the steering column to a slightly later one with a collapsible section, and dual circuit brakes with disk upgrade. No, it won’t be as safe as a modern car, but it will be far safer than it would’ve been otherwise.
Oh, and wheel bearings. Repack your wheel bearings if you don’t know the history of them. 40 years ago I pulled the front end apart to replace link pins on an old car and the bearing cage came out in pieces. Without that lucky impromptu inspection it would have been only a matter of time before total failure. That lesson was immediately burned into my brain.
You talk about tire pressure, but you didn’t talk about the age of the tires or how to check them. What age should you replace them without them blowing apart on the highway? Most classic car tires have lots of tread on them but there 10-20 years old.
It was lightly touched on in one of the comments but not in the main article and that would be, when checking tire pressures, to CHECK THE DATE CODE ON THE TIRES! Even though I check it every year when doing the winter maintenance I quickly forget, or it doesn’t quite sink in, and suddenly I’m checking the pressures before taking the B out for a run, notice the date code (again), and think “holy crap, has it been 8 years already?”
Since everyone is talking tires…a no brainer but spare.
and make sure the spare has the proper air pressure