What Places Are Notoriously Hard to Reach on Your Car?
We all have to dig into our vehicles to repair, replace or simply retrieve something at some point. Be it addressing a bad exhaust manifold gasket, failed starter, or your cell phone that slid between the seat and the console, some places are notoriously hard to reach. Sometimes it feels like this was created by design, especially when you need to get something done quickly.
This week’s question should generate many unique stories and relatable tales of painfully difficult things to reach in your vehicle. There are just some places that are so much harder than others, especially on some vehicles. For me, it’s the ritual of doing an oil change on my Lincoln Mark VIII, because I truly hate the filter location.

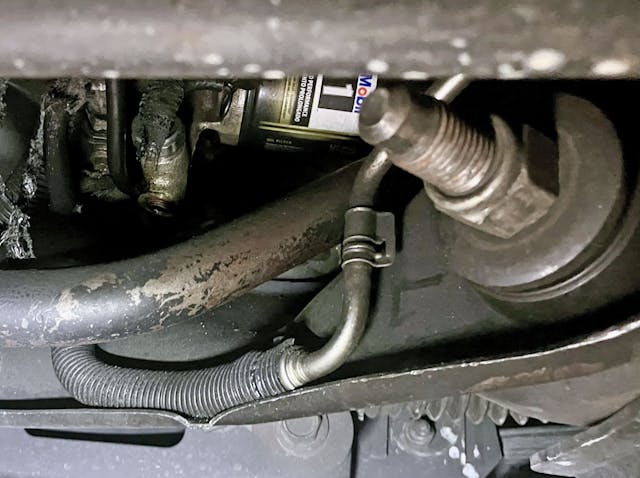
See the Mobil 1 oil filter nestled deep within the engine cradle, further obscured by the anti-roll bar underneath? Granted, I’ve made this job harder for myself, as said bar is a much larger piece from Addco. While access to spin the oil filter off from the block is straightforward, the oil pours down the engine cradle (all around the pictured metal/rubber hose) and collects at the divot in the cradle’s sheetmetal. It’s a mess, especially since there’s another divot which requires careful placement of your oil pan to ensure it catches used oil from both locations.
It’s a hot mess (literally), but I haven’t even discussed the real chore: getting the oil filter between the engine and that Addco bar. The trick is to stick your pointer finger in the oil filter, clamp down with said finger, and pull down hard so it slides past the bar.
I’ve owned this car for over two decades and can change the oil without frustration, but this filter is still “notoriously hard” to reach. So now I shall kick the question back to you:
What places are notoriously hard to reach on your car?
***
Check out the Hagerty Media homepage so you don’t miss a single story, or better yet, bookmark it. To get our best stories delivered right to your inbox, subscribe to our newsletters.


The distributor “hold down” bolt on my 59 Oldsmobile is tucked tightly against the firewall. Making matters worse is the distributor cap “release” which is on the back side of the cap… also against the firewall. I had to make tools to loosen both!
Anything under the dash of ANY car, unless you can remove the front seats!
C4 corvette backup light switch located at the top of the transmission tunnel on the tranny. Cannot be accessed without the special GM dealer tool or fabricate your own tool. Ridiculous design and they always fail.
Speedometer cable end on Austin-Healey 3000 at the transmission.
Also the bolts attaching the drive shaft to the trans.
Changing the sparkplugs and adjusting the valves on an original Sunbeam Tiger. There is a grommet through the firewall to give access to the #8 plug, and removing the valve covers is a horror…
On the 2012 Charger I once had, you must loosen the entire front facia to replace the head lights.
Replacing the starter on my 1959 Thunderbird requires three of my stiff hands hands to move it up over the steering arms and maneuver into place. I finally got smart and loosened the motor mounts, then jacked up the engine for clearance between the frame cross member and the starter. Forget about doing this with a hot engine. Ditto setting the points on my 1956 Ford Y block V8 with the distributor hugging the firewall.
Replacing the bulbs on my 2012 CTS-V. While the headlights are HIDs, the DRLs and turn signals are incandescent bulbs.
You need to remove the entire front fascia to get at the bulbs.
From my early wrencing days working in my uncle’s auto repair shop, it seemed like I was always the one stuck changing the plugs on early ’80s Camaros and Firebirds with the V8. The two nearest the firewall on the passenger side required you to try and access the plugs through the wheel well with a really long extension.
Not as much of an issue if the car is in the shop on a lift, but I have a memory of a REALLY cold January in Chicago. The car was parked on a side street and the snow was pretty deep. The car wouldn’t start so we suspected the plugs were fouled. He sent me out there to change them.
I ended up replacing the ones I could access, enough to get it started and even though it was probably running on 5 or 6 cylinders, it was enough for me to get it out of the snow and into the warm shop so I could finish the job.
To add on to my previous post.
I haven’t had to deal with it yet (and hopefully never will), but apparently the fuel pump hat on the 2nd gen CTS-V is known to crack. The only way to access it is to drop the gas tank, which requires you to remove the exhaust and drop the rear suspension cradle.
Some people devised a method where you remove the rear seat bottoms so that you can cut an access panel to get at the fuel pump, but you have to be very careful as there is a wiring harness nearby and if you’re off by just a bit, you have bigger problems.
Also the driver-side blend door actuator on a 2010 Ford F150. It’s a $40 part, but you have to remove the center console and much of the dash to get to it. Fortunately when our failed it was still covered under an extended warranty. Dealer said it was a $2,500 job at the time.
Anything on a 1980’s to 1995 Rolls Royce. What crap cars.
Most everything is pretty easy to get to in my 66 El Camino, until you need to go behind the dashboard. That’s where it gets tough. My situation is complicated by having a factory air conditioned model. The hard plastic AC ducting must be partially removed to access the back side of the dash in the middle. His makes it challenging to replace the radio and HVAC controls. The 3 bolts that hold the ac duct in place are fairly easy to remove but getting the last one to line up and thread on is nothing sort of a magic trick which found me praying to the gods of all things mechanical for special powers.
Passenger front spark plug on 1973 Trans Am with 455 and A/C. Not visible under compressor and difficult, if not impossible, to get a ratchet with spark plug socket down there without risk of breaking ceramic tip of plug or worse, cross-threading it. The simple solution was to remove passenger front tire and go in through wheel well above the upper A-arm. It was a straight shot with a long socket extension(s) and you could easily see what you were doing. it became one of the easier plugs to replace.
Equally worse was installing a cowl induction actuator on the throttle arm of a 69 Camaro with a big block. It was easier to remove throttle arm and install actuator. Then you only had to re-install the arm and tighten the nut-bolt by feel while sprawled across the fender on multiple layers of blankets to protect the paint. Going underneath was worse being blocked off by the bell housing. The final adjustment of the actuator is through the carb linkage which is effortless.
On the brighter side of things, my ’56 T-bird was a dream to work on! For anything “up top”, just sit on the fender any put your feet into the engine bay! My ’69 Shelby GT 500 was a nightmare to just change the plugs!!!
Does anyone remember the Chevy Monza? Its engine bay was never intended to house a small-block V8 and access to the rear spark plugs was such that, on many cars, they never got changed.
There was a dealer in Tucson Az. That used to pull the engine to get that plug out. Set aside day and a half and about 400.00 at the time to do the plugs! Owen’s said car for year and some months traded it in for Chevy c1p. No more worries with changing out plugs, and a heck of a lot cheaper!!!
Removing the starter on a 1968 Chevelle with single exhaust requires removing the Y-pipe first. The plugs on my SBC with angle plug heads and headers come out and go back with a 13/16 box wrench. DUB6 (and probably others): top bell housing bolts are more easily managed with a 9/16 box wrench, from above, angled toward the front of the car. With the crossmember out, jack the gearbox up until it contacts the tunnel. This gives enough distance from the firewall to back them all the way out.