When Building Your Engine, Trust No One—Even Yourself

Basketcase is the common term for the motorcycle engine I received in early January. The engine arrived in 14 boxes, each box holding a fraction of an engine ready for assembly, all the parts nestled into the torn-up wrapping paper the seller had used to wrap their kids’ Christmas gifts. I’m a trusting guy. All the parts in those boxes might be perfect, but when it comes to assembling an engine, you should trust no one. It’s not personal, I promise.
It’s been nearly six months since the eternally optimistic devil on my shoulder convinced me to buy a really crusty 1988 Honda XR600R. I had grand plans to make the bike run again and to enjoy a season of riding before I tore it down and rebuilt it into the XR600R I’ve always wanted. Like any good project, things went pear-shaped pretty much immediately. Any home mechanic can relate to the various distractions, including daydreams of the project finishing itself, that kept me from any real progress for a bit.

I’ve been elbow-deep in nine Honda XR engines within the last few years, but the 600R is a new puzzle. After spending a night or two cozied up with the factory service manual, I decided the whole ordeal was nothing to stress over. This model had a couple small quirks compared to the XR250R and XR200 motors that have been eating up most of my time (and all of my money), but nothing too crazy.

Actually assembling the engine is not the annoying part. Instead, it is the process of getting familiar enough with a new-to-me engine. When I’m pouring in oil and preparing to kick an engine over for the first time, I want to to be absolutely certain there are no missing pieces and that the ones I put together are all what they were supposed to be. One small rubber plug, and the oil system won’t work as designed—and just like that, all my parts become pretty scrap metal. I often rely on disassembling an incomplete or broken engine to teach me how everything fits. Part investigation, part 200-level course in applied engineering, disassembling a project helps my mind make sense of the drawings and wording of the service manual when I’m putting everything back together. And of course, reference photos—gotta love reference photos.
This XR600 engine gave me no such opportunity. Typically, the disassembly phase is the best time to take stock of the condition of the parts. My list of what components need special attention or replacing starts with the first parts that come off the complete engine. The powerplant in the XR600 motorcycle I bought late last year was so badly damaged that it made sense to buy an entire core engine. Better that than getting mired in the XR600R engine of Thesus and melting my credit card with eBay charges for onesy-twosy parts. And so I found a new-to-me engine that was “ready to assemble,” per the very kind gentleman who shipped it to me with recycled wrapping paper.

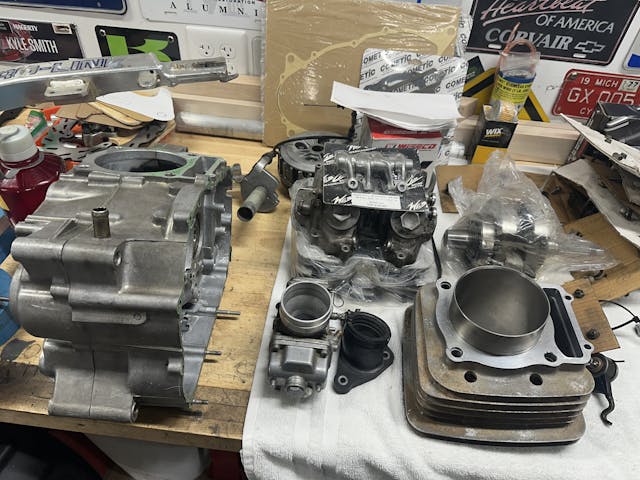
I look for the best in people as much as possible. But you and I both know jumping straight to assembly with an unfamiliar pile of parts is a terrible idea. The payment I sent for these parts was a statement of trust that I believe everything in those 14 boxes was what the seller told me it was. Once all the parts were laid out on my bench, it was up to me to confirm and verify that what I was assembling was indeed what I thought I was.
First things first, the crankcase. Most of its spinny bits are situated between two halves of a cast case. The crankshaft came with a receipt showing it had been pressed apart to remove the connecting rod and bearing and then pressed back together. While I couldn’t verify that the receipt belonged to this specific crankshaft, my calibrated hands and eyes found no reason to doubt that the work had been done, and properly.
The transmission was pretty grimy. It had been sitting uncovered on a shop bench for some time and needed a deep clean, which provided me a good excuse to check everything: gear tooth counts, spacer and bushing locations and directions, and the condition of the transmission shafts. That was when I caught problem number one: miffed threads on the input shaft.

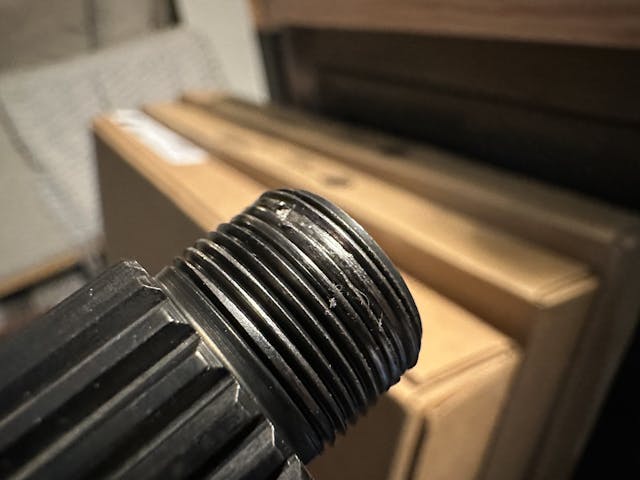
Something about me makes XR600R engine parts strip their threads. After a trip down eBay lane for a good used input shaft, I began cleaning the gearbox. Assembly quickly followed.
One of the fun things about the XR-series engines is the parts interchangeability between multiple models. While the stock transmission of the XR600R is okay, many years ago some people much smarter than me sat down and figured out how to even out the spacing of the gears while decreasing cruise rpm. They even managed to do it all with Honda OEM parts—specifically, the second and the fifth gear from an NX650 Dominator, a bike that Honda sold alongside the XR lineup. The U.S. only got the NX650 for two years in the late 1980s, but the Euro market liked the more rally-influenced styling more than we did, enough for Honda to keep the model alive in Europe through 2003. That’s a decent enough run to mean parts can still be found, but only just.

Assembling the transmission, and swapping in those NX gears, took a couple evenings and a weekend. The process took maybe a bit more time than if I had been the one to pull these parts from the engine myself, but probably not by much. It was a surprising, unique challenge to start with unknown parts that I hadn’t taken apart. Next up, after the cases were closed up, were the cylinder and piston.


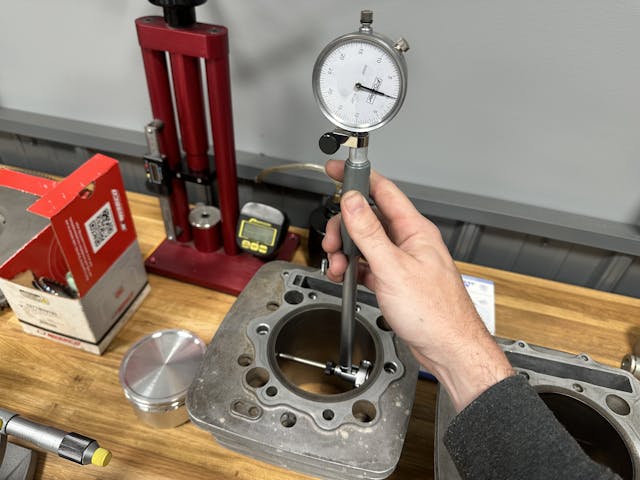
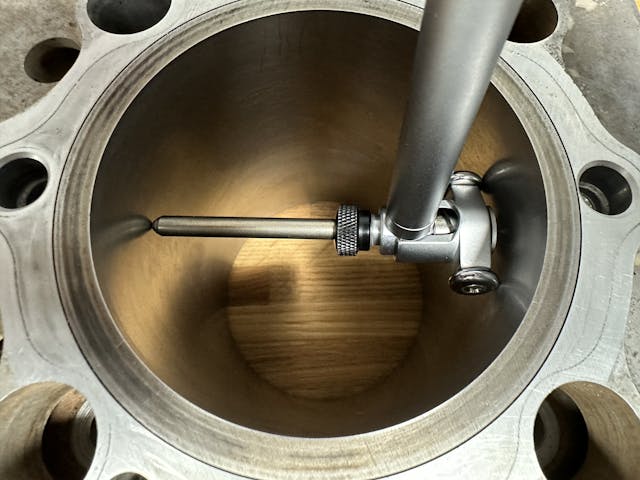
Measuring the bore required a trip to a friend’s shop, as I don’t own a dial bore gauge or a micrometer large enough to get the accurate measurements I needed. The proper amount of piston-to-cylinder clearance is critical to a long-running healthy engine. If this one was off, I would need to purchase a new piston and take a trip to the machine shop. Call it luck or just that people are good, but everything in the bore spec’d out beautifully, just as it had arrived from the friendly seller on the forums.
After getting the tools set and taking a few notes, I had said friend double-check my measurements before I headed out. You know, trust but verify—even yourself.
***
Check out the Hagerty Media homepage so you don’t miss a single story, or better yet, bookmark it. To get our best stories delivered right to your inbox, subscribe to our newsletters.


I agree 100%. I had assembled my own engines for years, but had to have one done at a local shop once due to health reasons (back surgery which precluded working over a bench and engine stand). I was not happy with some of the things I found later on – the thing ran, but things just weren’t done the way I thought they should be. I’ve since always done my own – and STILL I’m following a written checklist and pictorial guide that I’ve created for each engine I’ve owned. I follow the checklist faithfully and don’t trust myself to cut ANY corners just because “I’ve done this before”. I was doing this back in the ’60s when engines and parts were relatively cheap – at today’s costs, messing up can REALLY hurt, so I won’t trust anyone, not even myself. Well writ, Kyle!
I will do engine repair, but it is generally a get in, fix the problem, and get out scenario. I don’t do overhauls. It’s a niche thing and generally involves machine shop work that I am not equipped for. When it comes to replacements, I generally prefer a boneyard engine over a reman. Boneyard engines are cheap and it generally doesn’t take much to figure out if you got a good one or not.
Peek. Please.
Well written, good pictures and humble enough to admit we can get it wrong too.
I am in England and have been helping people around the world mend their grey imports from Japan since 1998.
I do it for free because I am a mug, some may say except I truly love to see classics out on the road and not tucked away awaiting an unobtainable part or measurement specification.
My name is synonymous on the Internet and I have reined it in considerably from abuse I was receiving.
I choose those I help now, as it was anyone before.
Bless You for continuning to help people even though there is always some idiot (you know who you are) who has to make a stupid and ignorant comment about said help. I also have had to distance myself from morons who know more (one had to take headers off a chevy motor to change spark plugs) he wouldn’t take my bet that I could. By the way, said moron also said he caught his beard in a weed eater! (told at a group lunch)
Still trying to figure that one out
Kyle, your note about your “daydreams of the project finishing itself” pretty much sums up every mechanical job I have endeavored to undertake. The struggle is very real for most of us who are not seasoned experts.
Check, re-check, triplecheck. Yep!
I lost a cam lobe on my sbc 350 once. The motor only had 50k miles on it at the time, after a complete overhaul. So I took it apart, replaced all the bearings then reassembled. My crank had been ground 0.10/10 and I knew it was good because hey, it had allready been running 50k. So I looked at my new main bearing set, all sealed in it’s bubble pack and the bearings said 0.010. Installed them and put the motor in. Once the motor warmed up it had absolutlly no oil pressure. Took it all back apart again only to find the upper bearing halves were standard and the lowers were 0.010. This was the only time i’ve never verified with plastigauge. After all it had been running and the when i looked at the bearing it said the correct size. I didn’t look at the top half. 🙁
That hurt to read, couldn’t imagine how it felt to pull the main caps off.
Plastigauge is our friend!
I’m winding up (I think) building a 4 speed Honda CB450 engine from a bottom end that came in a package deal with a bike and everything else above the connecting rods that I have rounded up from all over the internet. This is the first time I’ve put together an engine I didn’t take apart, and I feel your pain. The constant concern that you don’t know what you don’t know can make you nuts. Fortunately I found a forum for vintage honda twins and quite a few very informed and very helpful people around the world who answered questions and provided advice (and parts!) That made a huge difference.
kyle, apologies for not (yet) reading your article. it’s after midnite, just got home today from a 2,200 mi road trip (went out and got a rebuilt 390 cu engine & hydramatic tranny for my ’63 caddy), etc etc, and so i’m a little tired. yes, i WILL be reading your article, but later!
your article reminded me of a guy who owned a corvair specialty shop. he was rebuilding an engine behind the front counter. i thought it odd he would read a page out of the service manual, perform that task, then check it off a rebuild check list. i asked about it and his response was that he could rebuild those engines in his sleep. but, being interrupted at the counter constantly, the check list showed where he left off. and reading from the manual he said was a bit redundant but a good habit. too bad he sold my brother a bum engine! that aside, having to remove an engine a 2nd or worse a 3rd/4th/5th time because of a mistake is extremely frustrating and makes one have second thoughts of cars as a hobby. or worse yet, when it’s your daily and you’re frantically trying to finish up at 7 pm on a sunday night…
yup, good article. i believe the last engine i rebuilt was during summer of ’91. it was a L24 inline 6 out of a ’81 nissan maxima. bought it to flip from a customer that didn’t want to spend the $$ (threw a rod – ran outta oil). got a used engine i THOUGHT was no more than a cyl hone & re-ring. had .007″ piston skirt clearance on #1 cyl, making me sink another $500 or so into the project. finished the engine, got the car painted, new interior. after most efi sensors & misc parts bellied up the 1st couple months of driving, i had $3,300 total invested. nice car, put on about 10k mi with no problems after those 1st couple months. ended up selling it for $2,200. so much for a good used engine & the car’s market value 🙁